We’ve been teased by Cooler Master for quite some time. Since Computex 2017, they showed off an interesting piece of hardware – a low-profile CPU cooler that looks like a mushroom. Some call it a UFO. Now, we have the final product in our hands – it’s called the Cooler Master MasterAir G100M. A lengthy name for a tiny product such as this one, but it sure does pack a strong and dense punch.
This tiny little cooler is capable of doing something extraordinary with its shape and size – and rated to have an impressive 130W TDP. With such a small cooler? That’s very hard to believe – but this is where we test it out.
Specifications
| Product Name | MasterAir G100M |
| Model number | MAM-G1CN-924PC-R1 |
| CPU Socket | Intel® LGA 2066 / 2011-3 / 2011 / 1151 / 1150 / 1155 / 1156 / 1366 / 775 socket AMD® AM4 / AM3+ / AM3 / AM2+ /AM2 / FM2+ / FM2 / FM1 socket |
| Dimensions | 145 x 145 x 74.5 mm (5.7 x 5.7 x 2.9 inch) |
| Heat Sink Dimensions | 143 x 143 x 51.7 mm (5.6 x 5.6 x 2.0 inch) |
| Heat Sink Material | Heat Column / Aluminum Fins |
| Heat Sink Weight | 320g (0.70lb.) |
| Heat Column Dimensions | Ø41.2*46.3 mm |
| Fan Dimensions | 100 x 100 x 25 mm (3.9 x 3.9 x 1 inch) |
| Fan Speed | 600~2400 RPM (PWM) ± 10% |
| Fan Airflow | 22.63 CFM ± 10% |
| Fan Air Pressure | 1.6 mmH2O ± 10% |
| Fan MTTF | 280,000 hrs |
| LED color | RGB ready |
| Fan Noise Level (dBA) | 30 dBA (Max) |
| Fan Connector | 4-Pin (PWM) |
| Fan Rated Voltage | 12 VDC |
| Fan Rated Current | 0.34 A |
| Fan Safety Current | 0.37 A |
| Fan Power Consumption | 4.08 W |
| Warranty | 2 years |
| EAN Code | 4719512065341 |
| UPC Code | 884102037863 |
Unboxing
Taking a look at the box alone, it’s really tiny. Splashed with a dash of Cooler Master’s iconic purple, it has the specs list printed on the side. The MasterAir G100M is only slightly larger than the box itself as it has large foam pieces covering the top and bottom of the cooler.
Digging out everything reveals the MasterAir G100M itself and also the bag of mounting mechanisms alongside with the installation manual and warranty guide.
You do get mounting mechanisms for LGA2011 and a small tube of thermal paste.
Of course, RGB has taken over the world now and it’s obvious that the MasterAir G100M has RGB lights too. Else, why would the fan be transparent? The MasterAir G100M comes with a singular RGB controller that doesn’t have any software syncing. All of the lighting modes are changed with the buttons on the controller itself. It requires a Molex connector to power up the controller, by the way. If you have the RGB controller hub like the one we used here, then you can connect the MasterAir G100M to that hub instead. Else, just connect the 4-pin RGB connector to your motherboard directly.

The MasterAir G100M
What can we say more? It’s tiny. Cooler Master advertised this as a “great fit” for mini-ITX systems. Perhaps the Silverstone Sugo SG13 that we highly praised here? Standing at only 74.5mm high, it looks unique when compared to other typical low-profile coolers like the Noctua NH-C14 or be quiet! Shadow Rock LP. At first glance, everyone is calling the Cooler Master MasterAir G100M as the “psychadellic mushroom” or “UFO”.
RGB lights shine through the transparent fan at the top and there’s also another RGB light strip around the circumference of the circle.
At the bottom of the MasterAir G100M is where the magic happens. Cooler Master claims that the 130W TDP is in part due to the new heat column technology. Technically, it’s a large heatpipe. 7 times larger, according to Cooler Master. With a diameter of Ø41.2mm, Cooler Master claims that the unification of the base and heatpipe enables the heat transfer to be more efficient.
Installation
As described in the video above, we did encounter some weird issues. Firstly, because of the shape of the Cooler Master MasterAir G100M, the bracket can’t be accessed directly from the top. Hence, some other methods of installation has to be employed. Always consult your manual on the installation guide.

The MasterAir G100M comes with two different mounting brackets that first needs to be screwed onto the base plate of the MasterAir G100M. You’ll need to hold the bracket in place with one hand and screw it in with the other hand.
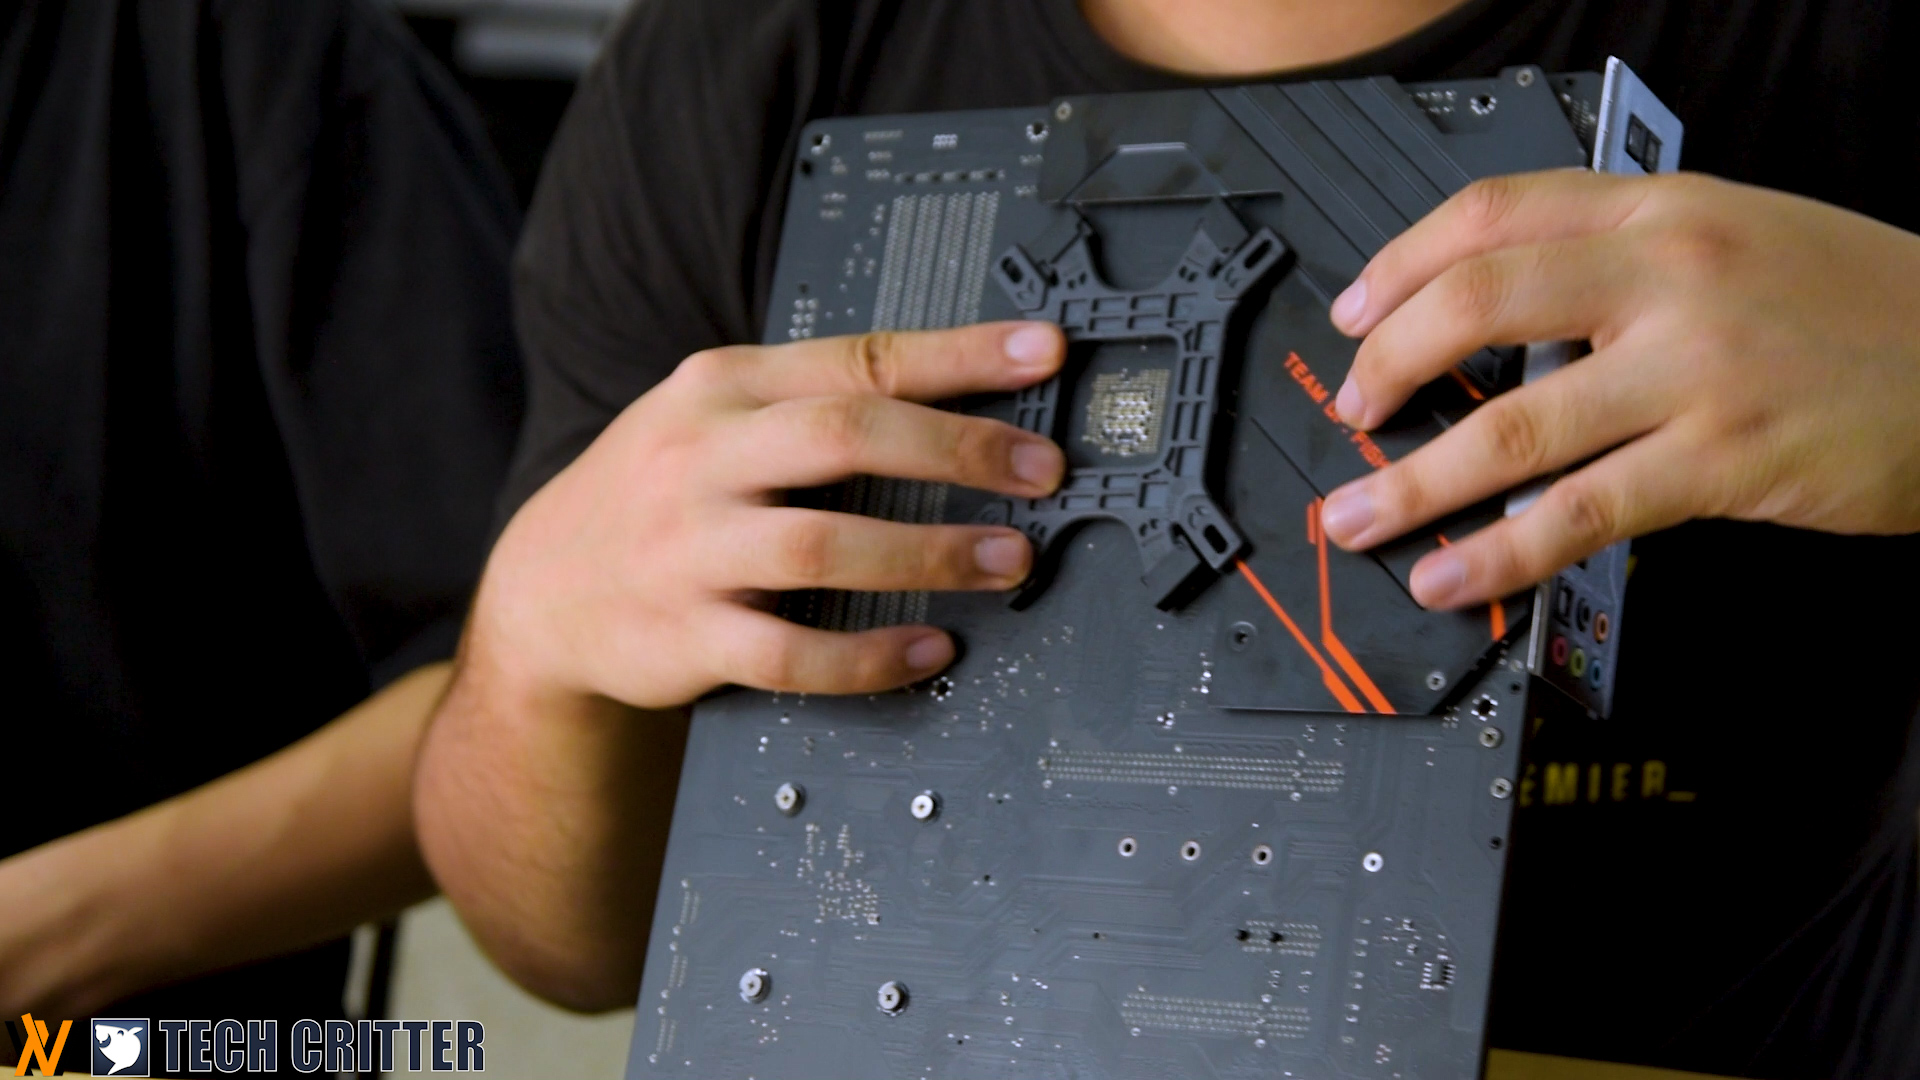
Once that’s done, it’s time to prepare the backplate. The user manual makes it pretty clear on how to do it. Once the backplate is installed, it felt wobbly and insecure (like me) at first but don’t worry.
Once that’s done, plop some thermal paste and the MasterAir G100M can finally be installed. Then, the entire mechanism is screwed, the entire backplate and cooler is tightly secured and doesn’t even budge when pushed. However, screwing it in is an issue since it needs a wrench. That’s very inconvenient.
One note – be careful if your motherboard has some sort of plate behind the motherboard. We used the Gigabyte X470 Aorus Gaming 7 WiFi and we had to remove that unnecessary metal plate behind the motherboard so we can fit in Cooler Master’s backplate to mount the cooler.
Another thing to be careful of is the RAM height clearance. It’s a tight fit even for the Trident Z that we’re using.
Testing methodology
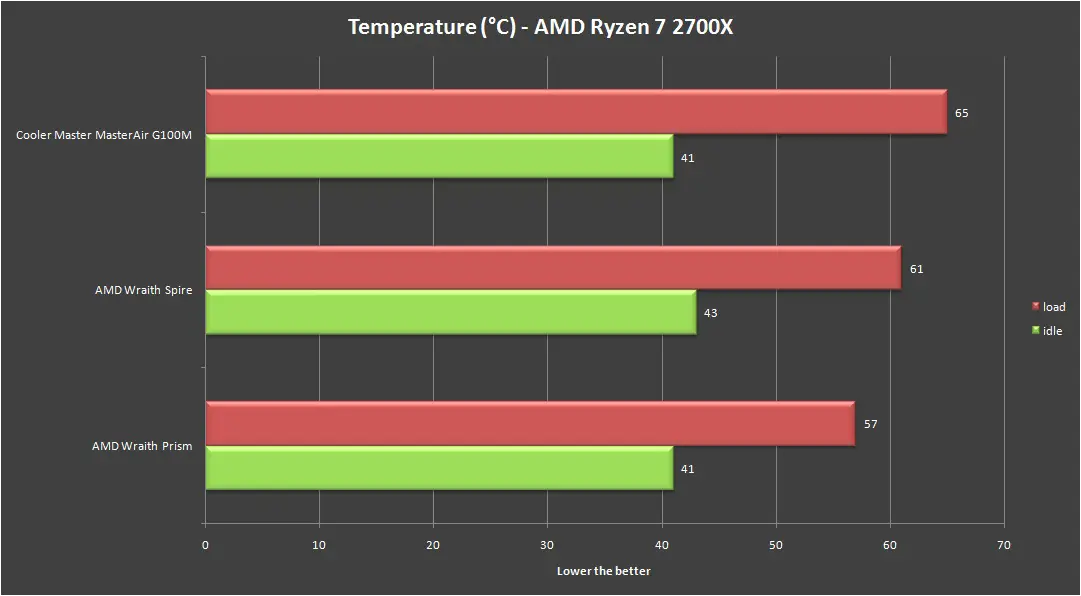
In this test, we’re using Prime95 with the option ‘In-place large FFTs’ for maximum heat output. The test is conducted under ambient temperature of 30°C using the following setup and the GC-PRO thermal paste from Gelid:
| CPU Cooler | Cooler Master MasterAir G100M / AMD Wraith Prism / AMD Wraith Spire |
| CPU | AMD Ryzen 7 2700X |
| Motherboard | Gigabyte X470 Aorus Gaming 7 WiFi |
| Memory | GSkill TridentZ RGB DDR4 @16GB |
| Primary Hard Drive | Plextor M9PeG 512GB SSD |
| Power Supply | Be Quiet! Straight Power 10 600W |
| Chassis | Cooler Master Test Bench V1.0 |
Tests are done independently for each of the CPU coolers – MasterAir G100M, Wraith Prism, Wraith Spire, until the performance is consistent throughout all the remaining stress test.
 The Cooler Master MasterAir G100M didn’t perform as how we expect it would be. It gets the job done, but it’s not doing better than both of AMD’s stock cooler despite of its size and the amount of aluminum fins it has.
Conclusion
So here’s what we have to say, the Cooler Master MasterAir G100M is definitely that one of its kind top flow CPU cooler you’ll ever find in the market as of now. Other than its mushroom / UFO like design, the RGB element is definitely there if you’re really into all the RGB effects. It can be synched with pretty much all the motherboards that has onboard RGB headers, or via Cooler Master RGB LED Controller if your motherboard doesn’t comes with any onboard RGB headers.
There’s no deny that the MasterAir G100M looks great for the show, but here’s the catch – performance isn’t that great, given that you’re actually paying RM 149 for one. It’ll still get the job done on most occasion, as long as you don’t push it too far with the CPU clock. Because of this, MasterAir G100M does make a reasonable choice for a build that is not intended for overclocking – system that runs on Intel non-K CPU such as a HTPC, basic gaming PC, etc.
If you’re planning for a low profile cooler for your upcoming RGB build without any intention on overclocking the CPU, the MasterAir G100M is one option you can really look into. Else, you’re planning to squeeze some extra performance out of your system, you might want to consider for a better performing tower CPU cooler such as the MasterAir MA620P to avoid thermal throttle.
Pros
- Solid build quality
- Silent operation
- RGB lighting is compatible with most of the motherboards with RGB headers
- RGB lighting can be controlled with the included mini controller or the RGB controller kit from Cooler Master
- Reasonable clearance for tall memory kit
Cons
- Not so impressive performance
- Included backplate has compatibility issue with some motherboards that comes with its own backplate


Comments are closed.