
Now we all know that German engineers are revered for their workmanship in producing quality vehicles but how about if they decided to build a PC chassis? Enter Nanoxia, a German manufacturer of quiet enclosures and chassis accessories. If you haven’t heard of them, check them out at their official website.
A big THANK YOU to the the team at APES.My for supplying a unit of the Nanoxia Deep Silence 1 for this review article. Retailing at RM370 (MSRP) it’s actually affordable, we’ll see how German Engineering is applied in the chassis.
Packaging
The Deep Silence 1 (DS1) comes in a large brown box with the brand name printed in the middle. Their motto “Nanoxia Next Generation PC-case” clearly written below the DS1 name and at the bottom, we can see that this is the windowed version of the DS1.

Boxeption!! they really take their shipping seriously. The inner-box told users to read the manual carefully.. a nice piece of advice really.

Taking the “box out of the box” we now have a full-colour glossy finished packaging. While it looks nice, I wonder how much will that contribute to the cost of the DS1. The front details the DS1 in the centre sandwiched between the multiple awards and the key features of the DS1.

At the back, Nanoxia depicted the features in full colour which looks more like an installation guide already.

Specs of the DS1 is available on both sides of the box.


External Features
Out of the box, the DS1 gives me a sense of elegance and simplicity. The colour scheme on this particular unit is the Anthracite (a variation of coal) variety. The DS1 (window version) is also available in Dark Black and White. Front bezel are two hinged doors with brushed aluminium finish but as with the top panel, it’s plastic in general. Looks great but do be careful when handling the chassis as it will be nightmarish to remove fingerprints from the brushed aluminium panels. As this is a silent chassis, the ventilation comes from the sides of the front panel feeding the 2x 120mm fans with fresh air.

The top door concealed 2x fan controller sliders, a reset switch and 3x 5.25″ bays while the bottom door opens up to 2x 120mm fans. we could see some foam padding on the doors itself which helps to minimise the noise coming from the 120mm fans at the front. Do note that the doors only opens from left to right so do think about where you want to place the chassis before plugging in all the connectors on your setup.
Implementing separate doors at the front enables users to access the 5.25″ bays without having to reveal the fans and vice versa. This is very effective and simple solution for eliminating noise while the 5.25″ drive is in use. Use of magnets is a very much welcomed feature as well.


Right side panel is a solid piece.

At the back, we see mounts for 140mm (included) or 120mm fans, the I/O knockout, 8x expansion slots, rubber grommets on the top and side and a standard ATX-sized PSU mount at the bottom.

At the top panel, there is a single start button. The translucent ring is actually an embedded Power LED and HDD activity LED which delivers a cleaner look than having them elsewhere.

Note that rectangular piece right behind the power switch? that’s the “stealthed” front I/O panel. Poping it out required little effort and you’ll find 2x USB2.0, 2x USB 3.0, microphone and audio jack. Pretty neat but it wasn’t really 100% flush against the top panel.

The DS1 have a “chimney” for heat exhaust at the top panel as well which opens up by sliding a switch at the left side of the top panel. According to Nanoxia, this will help exhaust the heat should it be required. We’ll see how much more heat they mean and if there is a difference at all.


The PSU mount have four rubber support at the bottom and foam at the back is a foam sound dampener to further minimize the vibrations transferred to the frame of the DS1.


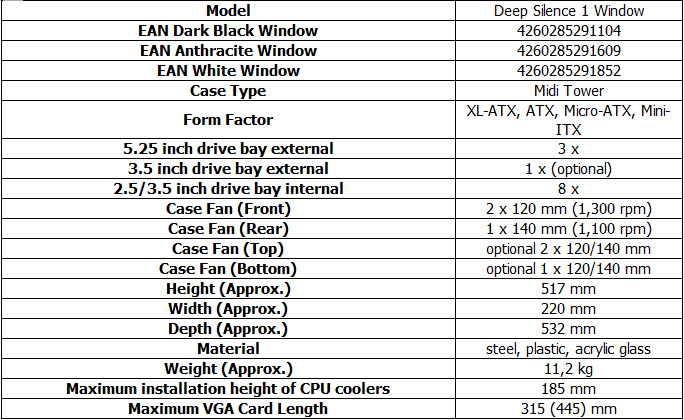
Looking at the modular HDD cage, you’ll have to lift the tabs from the back and slide to the front. Would’ve been nice if the cage can be removed just from the front as one wouldn’t have to remove both side panels just to get at the modular HDD cage.

Though being of modular design, there are lost of orientation for the HDD cage placement as demonstrated in the following pictures.


Oh and lets not forget the HDD mounting mechanism shall we? looks really familiar to the ones found on Fractal Design chassis.


Installation and testing
Very little trouble installing hardware in the DS1, spacious enough to work around even with my Thermalright Archon SB-E X2 mounted (yes you can fit very tall air-coolers in the DS1). The only real difficulty is that one would have to be vigilant with the PSU cables behind the motherboard tray, especially when it is of a non-modular design as space is very limited.

The usual suspects such as Prime 95, MSI Kombustor will be used to crank up the heat of the components which will be measured via the use of HWMonitor. The rig will be left on for 30 minutes for each idle and load tests on stock configuration for the chassis with their original fans mounted as you would get in retail.
Without Further ado, here is the test setup used for the comparison:
AMD PhenomII x3 710
Asus M4A785TD-V Evo
Thermalright Archon SB-E X2
Sapphire HD7850 2GB
Samsung HD 502J (HDD1)
Western Digital WD10EALX (HDD2)
Cooler Master G550M
And here are the results!
The DS1 did surprisingly well in the temperatures beating the Shinobi XL in all fronts. Both chassis is left with their stock fans mind you, really shows that the DS1’s airflow is very well thought of despite it being a silent chassis. I’ve also tested with the DS1’s chimney open but I do not see any improvements to the temps compared to the results shown here; results may have been different if there were fans mounted at the top.


The DS1 is a classy chassis no doubt. Aesthetically simple and elegant, with the noise dampening ability and native water-cooling support. It’s not perfect but I think it will meet a lot of people’s requirement for a PC chassis. One thing is for sure that whatever German engineering techniques were implemented on the Nanoxia DS1 worked well in it’s favour.
Pros:
- Elegant and functional brushed aluminium front panel
- Stealth front I/O ports
- Easy access to front fans and dust filters
- Built-in dual fan controller
- Modular HDD cage
- Native 240mm radiator support
- Great airflow
- Use of Bitumen-compound sound proofing material
- Rubber grommet placement for M-ATX form factor motherboards
- Unique chimney mechanism
Cons:
- Brushed aluminium front panel is the ultimate fingerprint magnet
- Need access from both front and back to remove HDD cage
- Lack of space behind the motherboard tray
- Side panels need to slide open/close
- Really heavy (with side panels on)
.jpg)


2 thoughts on “Unboxing & Review: Nanoxia Deep Silence 1”
this actually look neat… nice review..
Thanks for the feedback. Will bring more products for reviews, thanks for the support so far
Comments are closed.