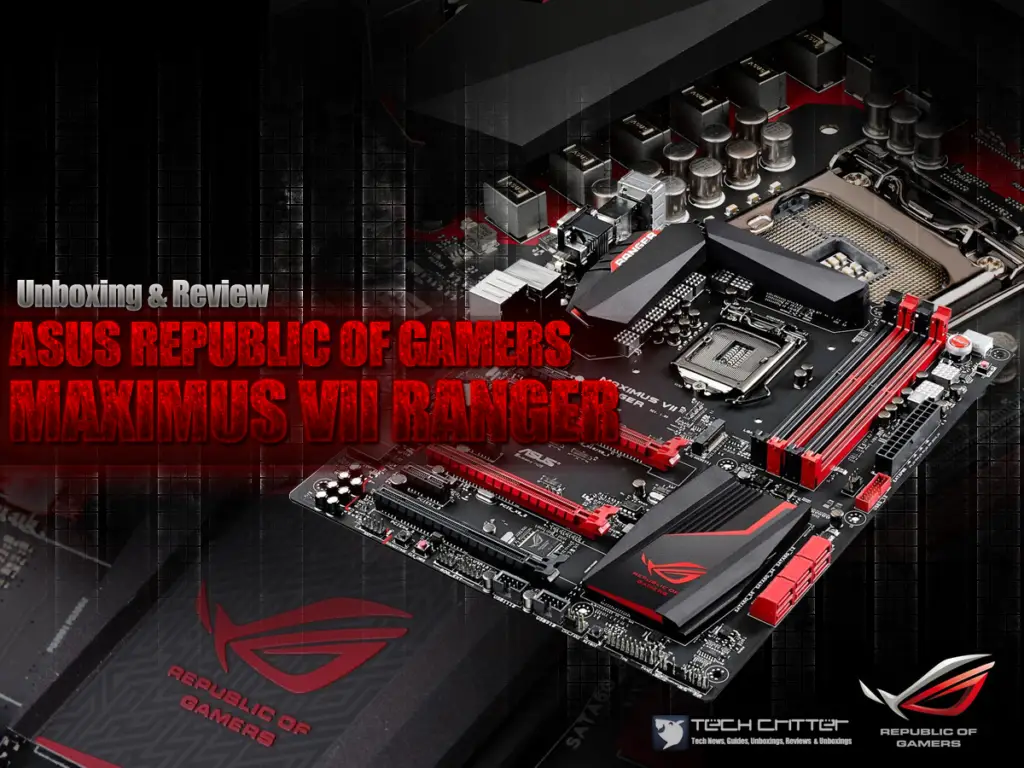
I know for a fact that the majority of PC gamers and enthusiast will be familiar with the Republic of Gamers (ROG) line of products from ASUS. For many of us it is a dream to own one and only until recently that the dream became more accessible.
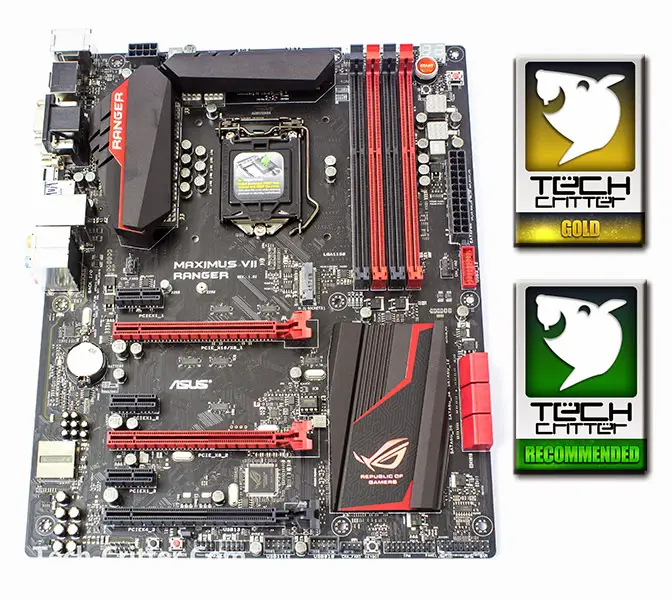
The ASUS Maximus VII Ranger is dubbed as a “High Value Entry Level ROG Gaming Motherboard” and at RM699 SRP, we believe this is much more affordable to more users. We agree with the high value part, but we’ll see how much of an entry level is the motherboard. A mighty thanks to ASUS Malaysia for procuring the star of this article, lets get to business!
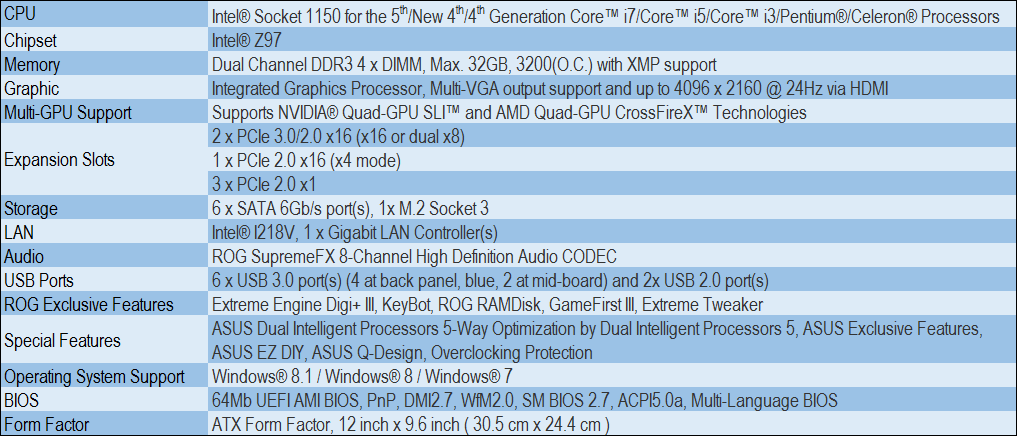
Specifications
Packaging
The ASUS Maximus VII Ranger’s comes in the well-known ROG-Red themed retail box. Up on the front you get the product name, the ROG logo at the top corner and a small row of features down at the bottom next to the ASUS brand.
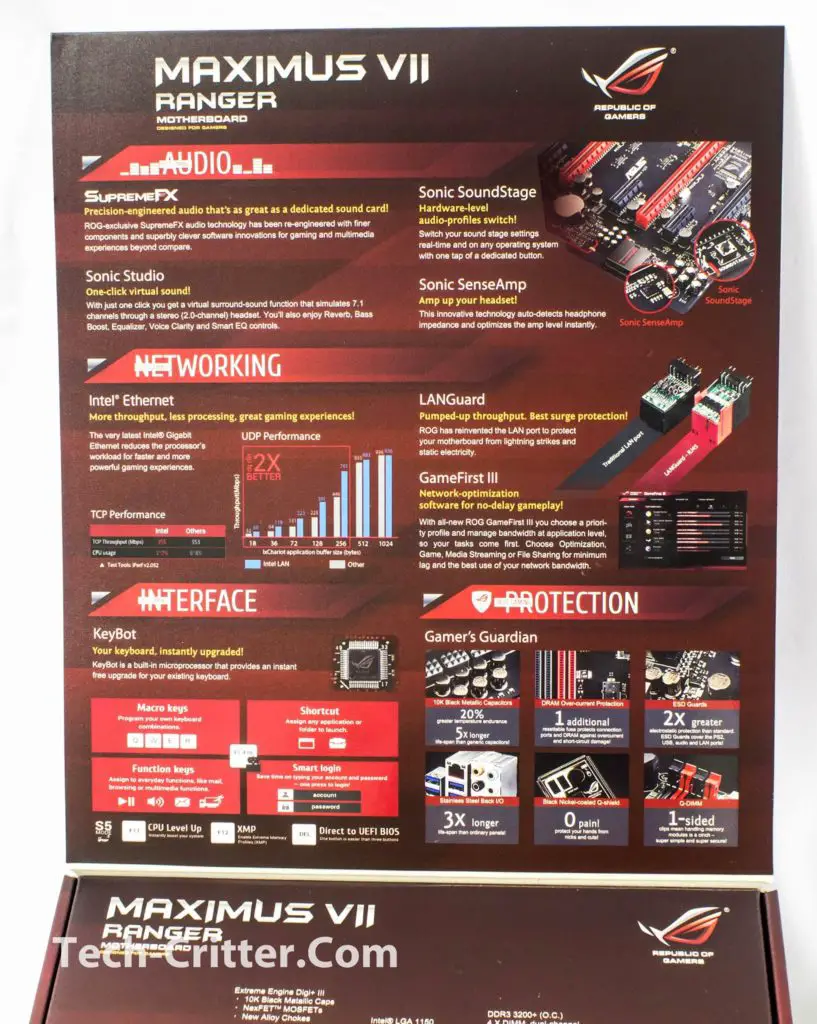
Flipping up the top flap, you’ll be greeted by an introduction of the Ranger’s features.
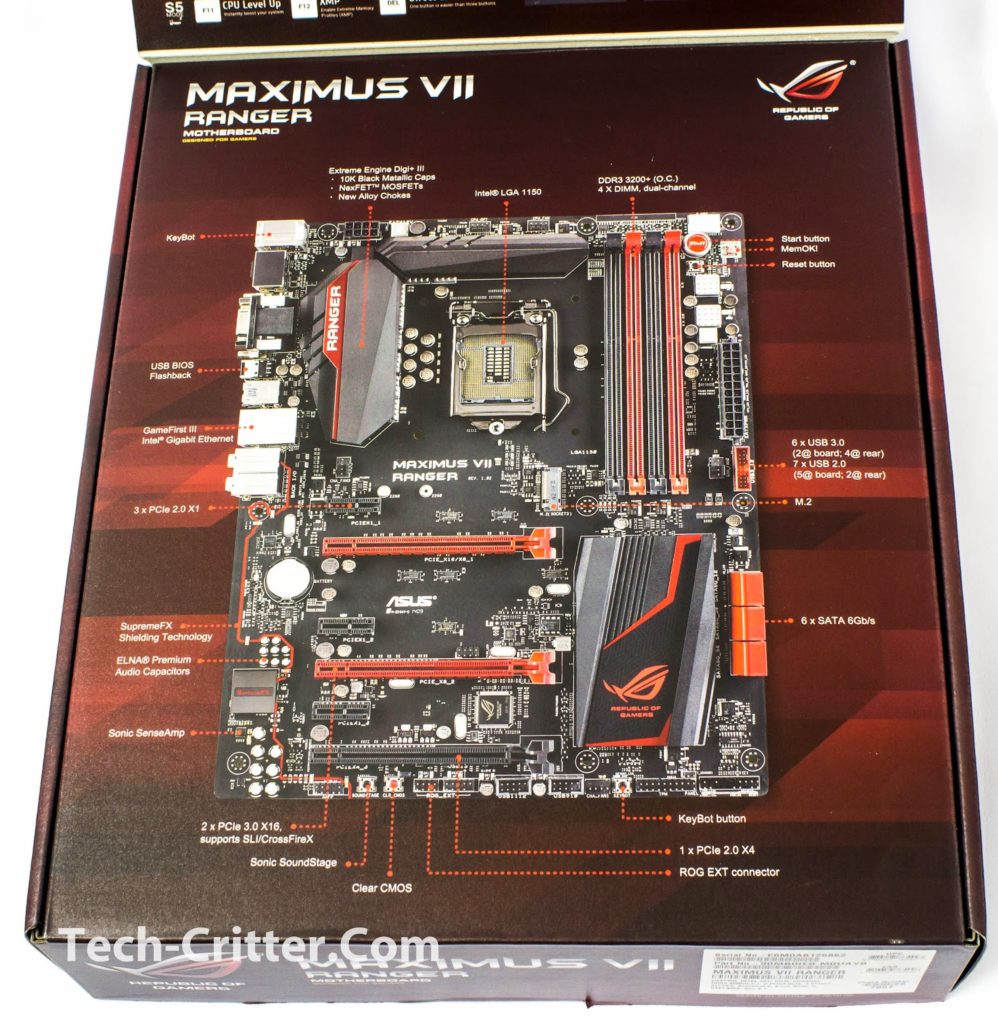
Instead of a see-through window, you get an illustrated guide of the Ranger.
More features highlights and Specifications of the Ranger can be found at the back.
The first layer of content is none other than the Ranger motherboard in an anti-static bag.
Just right below that are the accessories.
So we have an IO shield, ROG DND Door sign, 4x Sata cables, Cable label stickers, Quick start guide, User guide, Driver disc, 2-way Crossfire bridge and Q-Connectors. There is also a metal ROG emblem hiding behind the Driver disc.
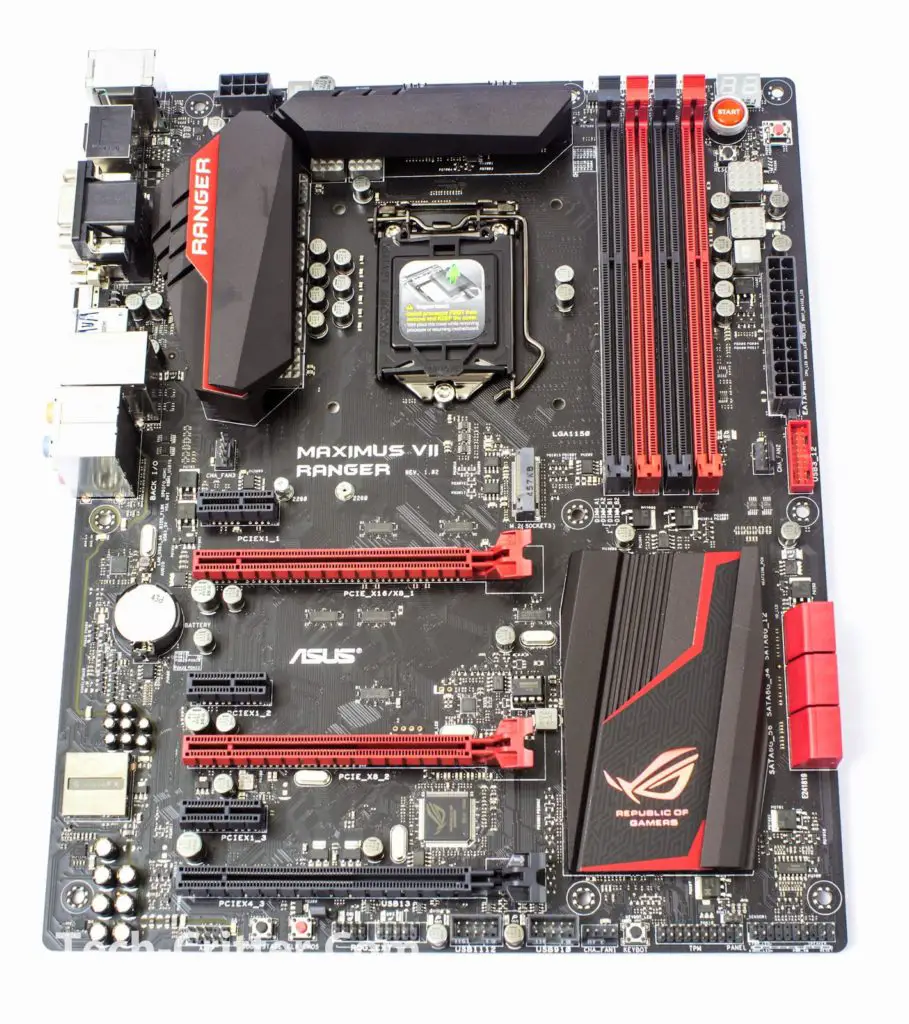
The Motherboard
Out of the box and anti-static bag, I have to say that the ASUS Maximus VII Ranger looks great with the black/red theme. Especially when they have multiple coatings on the matte black PCB.
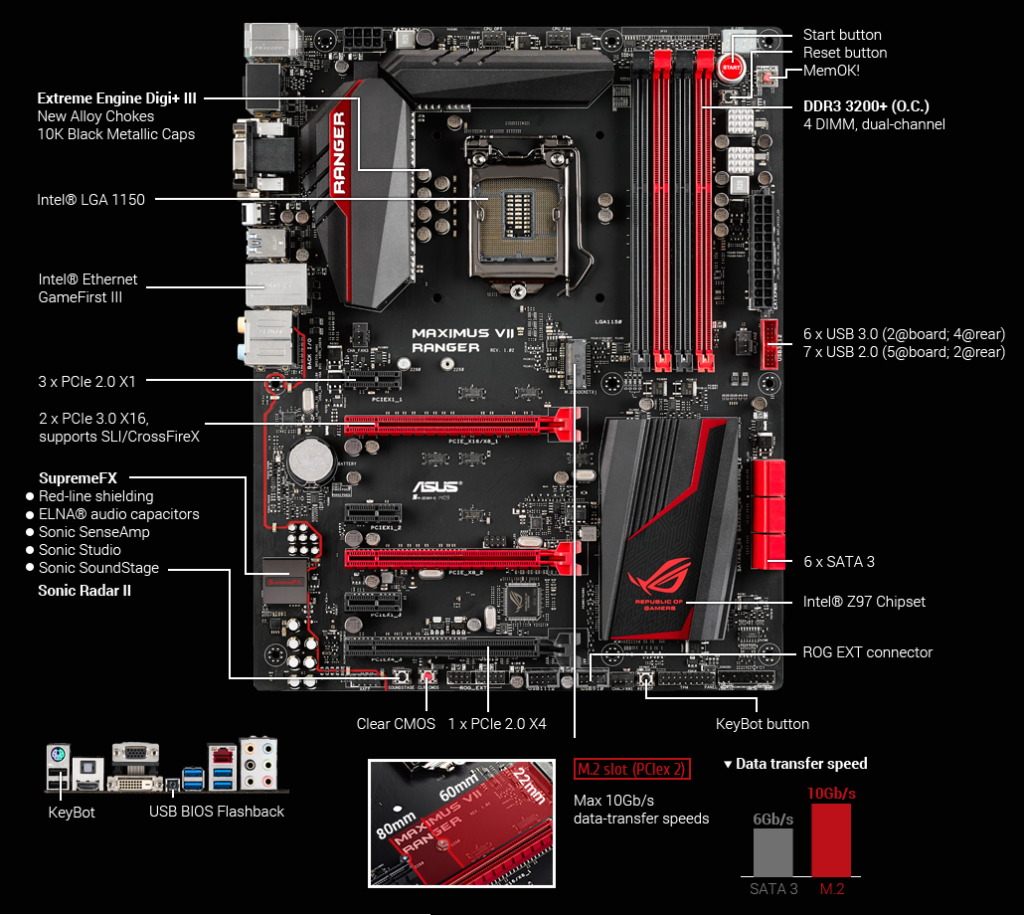
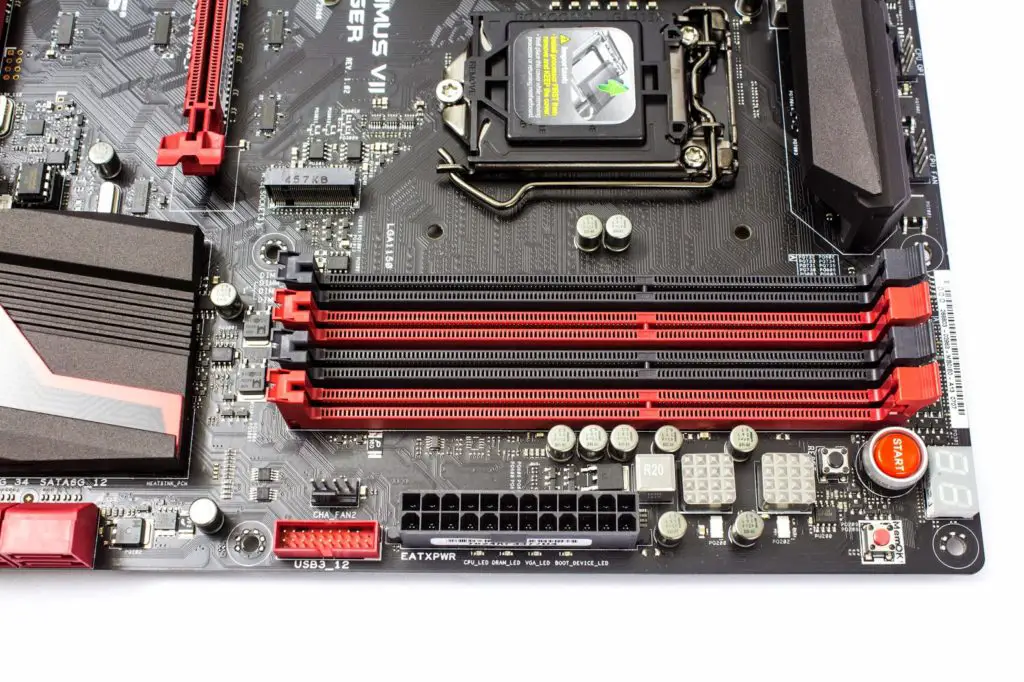
The CPU socket area’s layout is very clean with stylised black nickel coated heatsinks over the mofsets, providing an 8-phased power delivery for the CPU. The new M.2 PCI-E interface is also found right below the CPU socket. Rather than explaining the use of this new interface, check out the performance of the new M.2 PCI-E SSD in our review of the Plextor M6E M.2 2280 PCI-E SSD.
An 8-pin ATX power connector sits right above at the corner at it’s ideal location along with a terrific placement of dual 4-pin CPU fan headers; kudos to ASUS for implementing this.
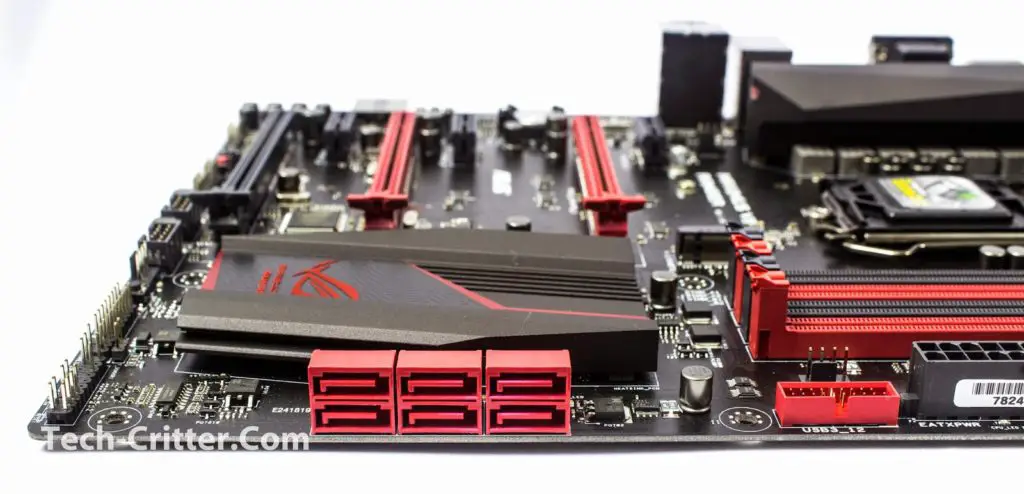
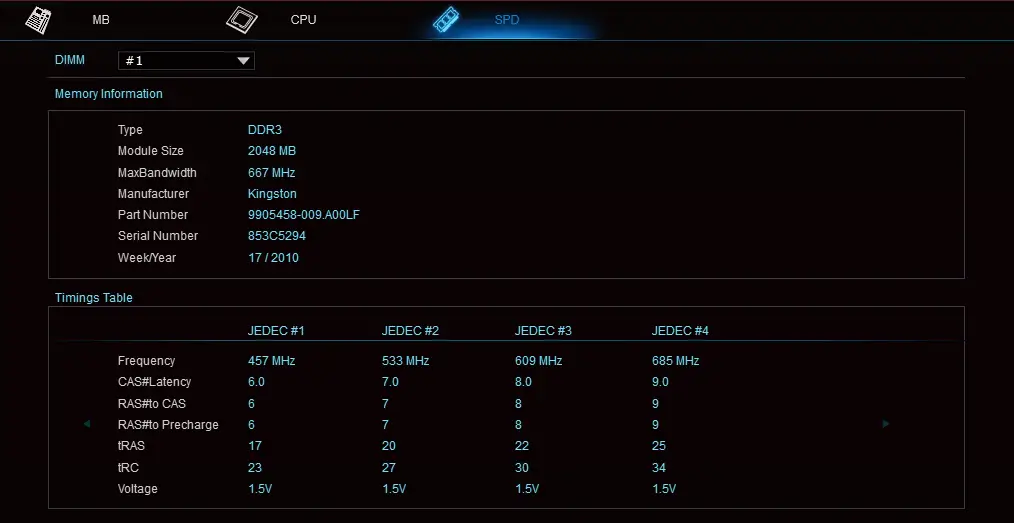
Shifting our attention to the 4 single-latch DDR3 RAM slots, these provide support of up to 3200Mhz in speed and 32GB in capacity. Right beside these slots is the 24-pin power connector, a USB3.0 header and the onboard buttons…
Consisting of Power/Start and Reset that are handy for test bench setups as well as a MemOK button that will help with memory compatibility. A diagnostic Q-Code LED indicator sits right above for easy troubleshooting.
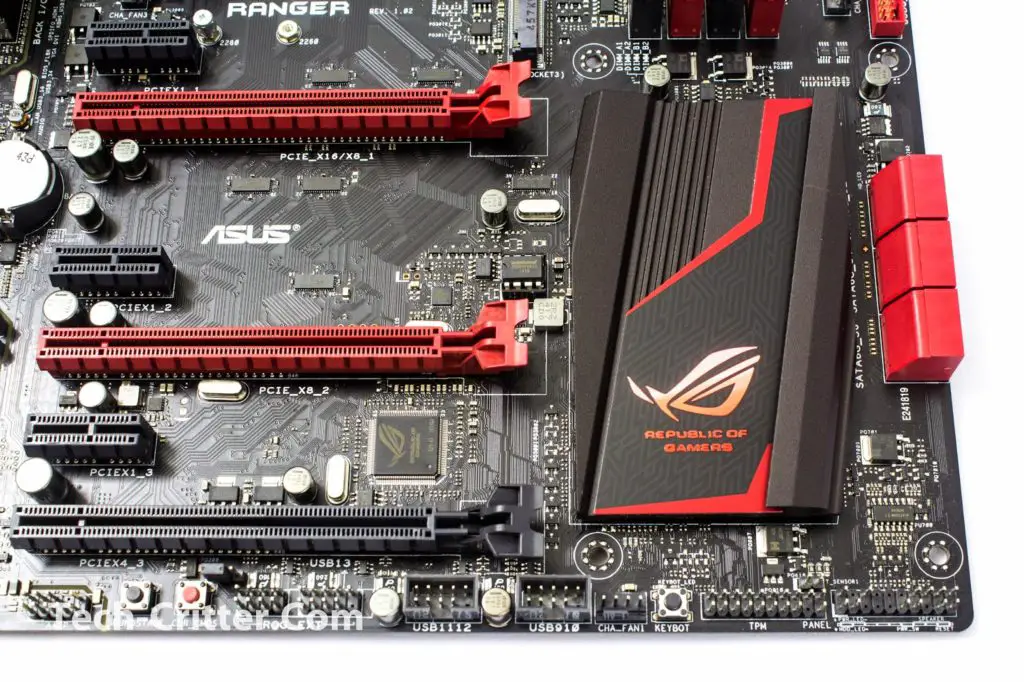
Looking southbound, the chipset heatsink is covered by a huge stylised heatsink with an ROG emblem. It doesn’t glow but it still retains that aggressive look of the ROG lineage.
Two PCI-E 3.0 x16 slots are spaced further apart to accommodate better cooling for dual GPU configurations; a PCI-E 2.0 x4 is also available that supports a third GPU (Warning: bandwith limitations unavoidable). Three PCI-E 2.0 x1 slots in between these are open ended as well so that one may plug in an x4, x8 or even an x16 expansion card if needed, not that it’s recommended in most cases but it’s an option worth having.
Regulating the PCI-E channels is done via multiple Asmedia ASM 1480 multiplexer / demultiplexer Switches.
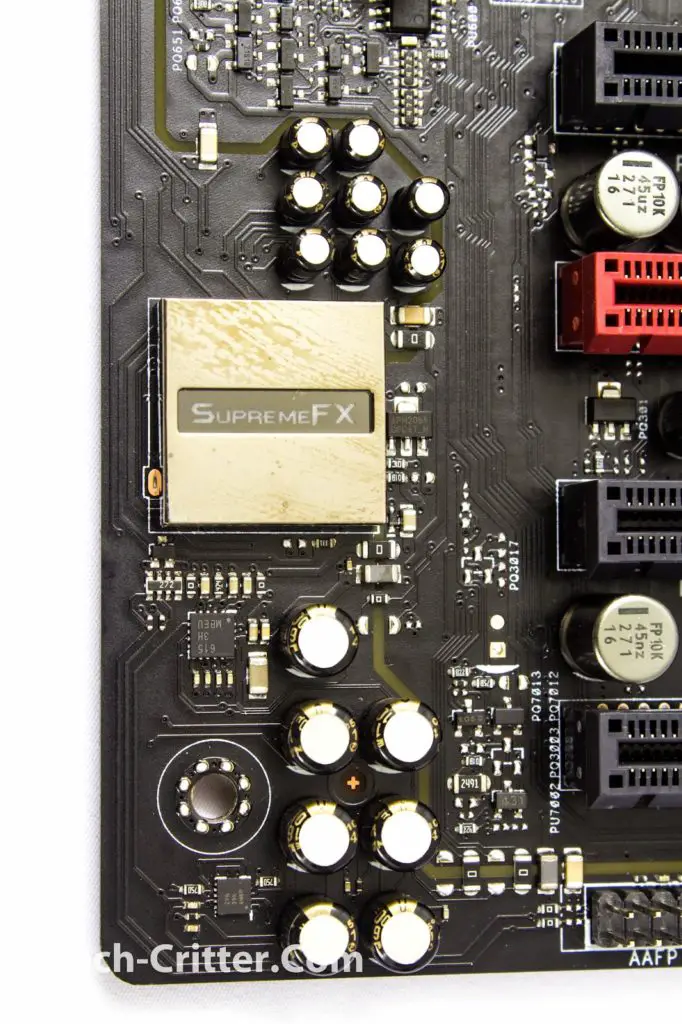
The Ranger incorporates a SupremeFX audio system running Realtek ALC1150 codec with the use of high quality Japanese ELNA caps and further EMI shielding to minimize interferences. The PCB is physically isolated and is indicated with an illuminated red line when powered on. Coupled with Sonic SenseApp and SoundStage ensures that you have the best gaming audio experience possible.
The SoundStage and Clear Cmos buttons are accessible at the bottom edge. If you have the ROG OC Panel and/or the ROG Front Base, note that the connection header is right beside the said buttons.
Moving to the right along the bottom edge, you’ll find the usual 9-pin USB 2.0 headers along with the KeyBot switch. Actuating this will allow you to assign macros and functions to a normal USB keyboard, very useful feature for those of you who don’t have a macro-able keyboard.
Six SATA 6gb/s ports are available on the Ranger as opposed to eight found on the Hero but it should suffice for most users.
Even the rear I/O is not left out of the premium treatment, ASUS claims that the stainless-steel panel here will last 3 times longer than the competition. Here is a list of what you’re looking at:
PS2 Keyboard/Mouse
Keybot / USB 2.0 port + USB 2.0
Optical SPD/IF out
HDMI (Supports 4K)
VGA/D-Sub port
DVI port
BIOS USB Flashback button
4x USB 3.0 ports
Gigabit LAN port
8-Channel Audio
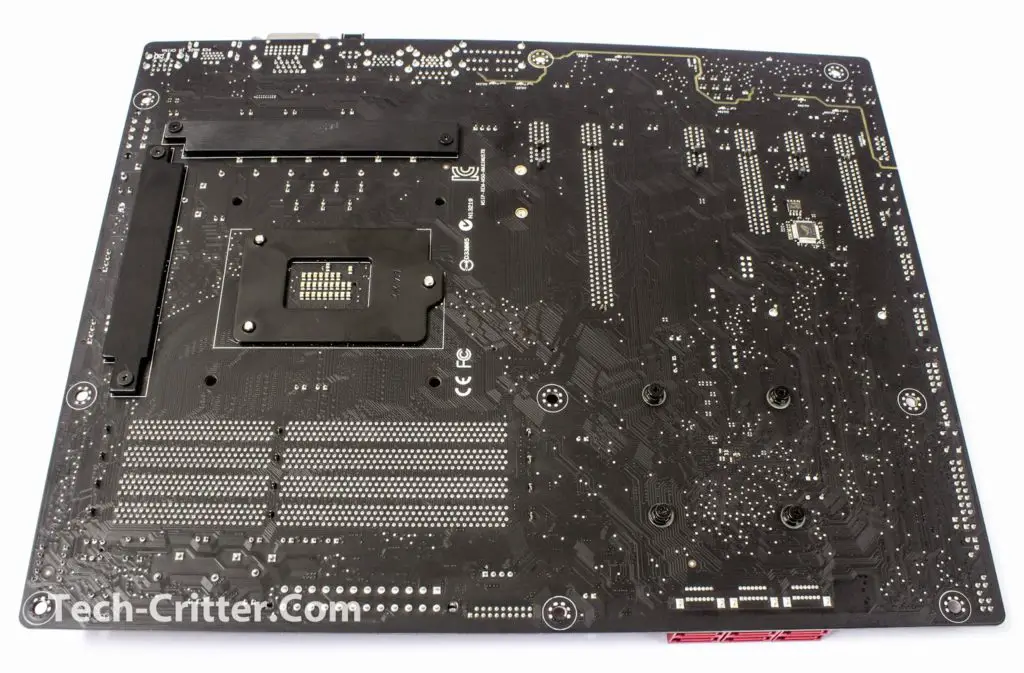
Turning to the back of the motherboard, ASUS made it a point to use screws instead of pins to secure the heatsinks. There are also an extra strip of metal that acts as heatspreaders that provides extra cooling to the mofsets on the opposite side.
And here is where the KeyBot chip is hiding all this while.
UEFI BIOS
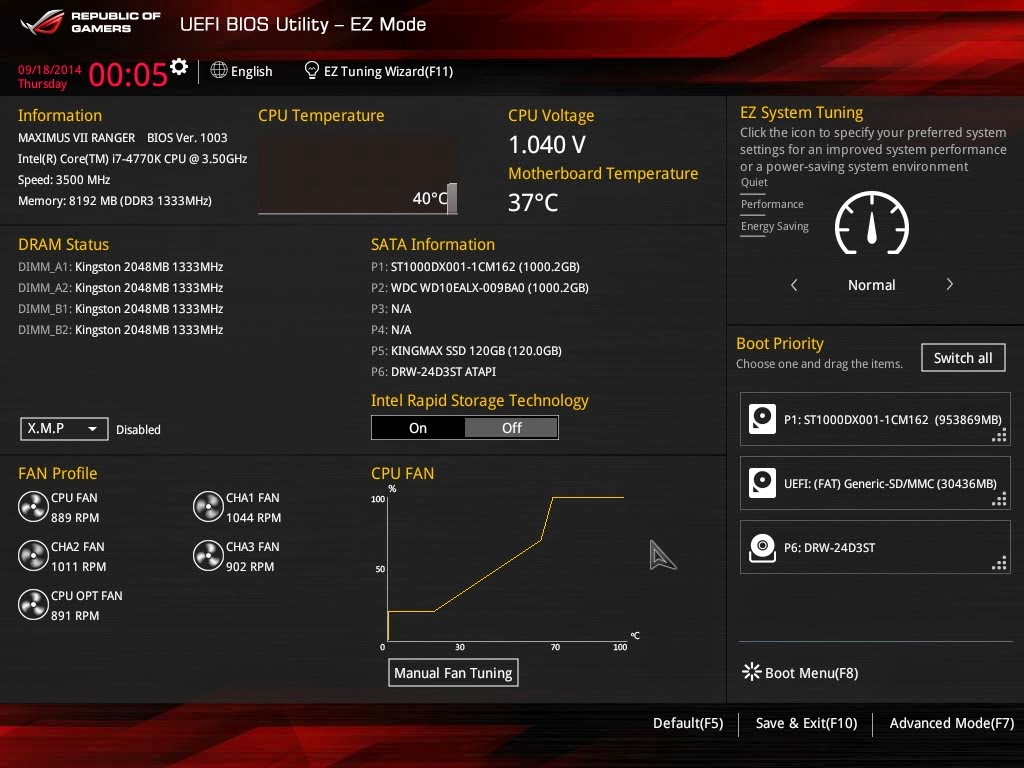
Hitting the Delete button during post will get you into the UEFI BIOS of the Ranger. Aside from the red and black theme and extra menu options, the layout feels pretty much the same with the ASUS Z97 Deluxe, Z97 Pro and Z97I-Plus that we’ve reviewed recently. The EZ Mode displays the basic information of the system and allows users to tweak some basic settings such as Boot Priority and Fan tuning.
Hitting F11 will initiate the EZ tuning wizard, a simple way to OC your system as a whole. Just follow the instructions as you click next and you’re well on your way.
The need for an external fan controller is also obsolete with ASUS’s Q-Fan tuning. Users could control every fans that is connected to the Ranger’s fan headers, a very nifty feature for those who likes to take control.
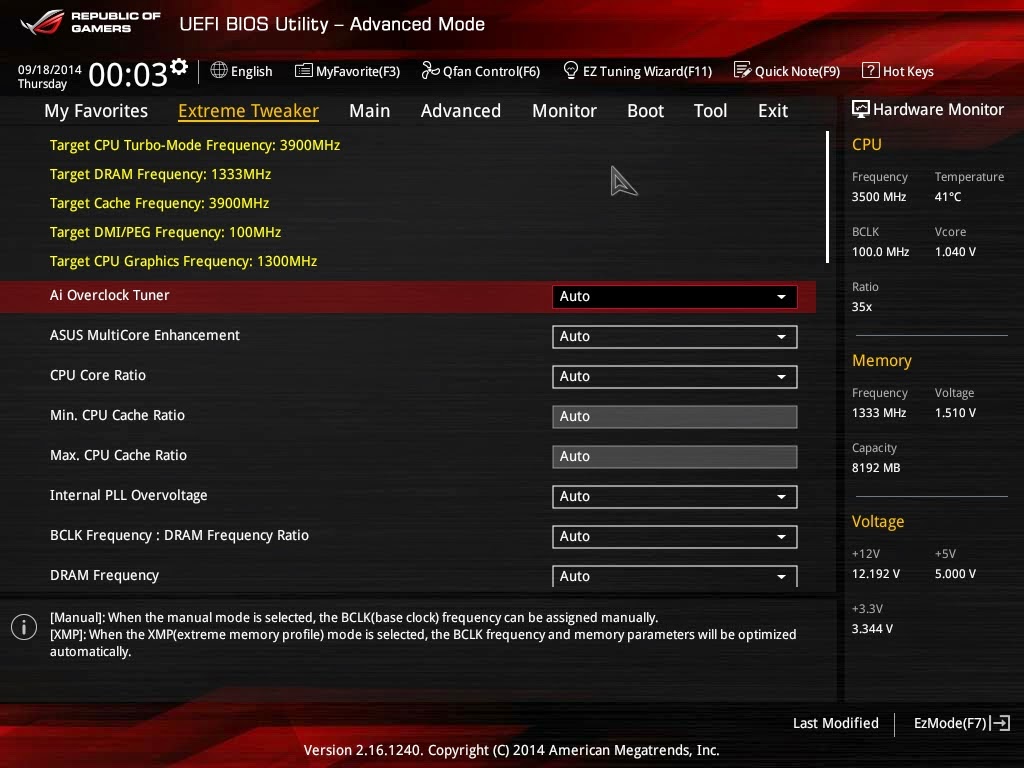
Hitting F7 on the keyboard brings you to the advanced mode of the UEFI BIOS. Here in the Extreme Tweaker tab is where advanced users will fine-tune their overclock settings, on-the-fly changes are highlighted in the yellow texts at the very top.
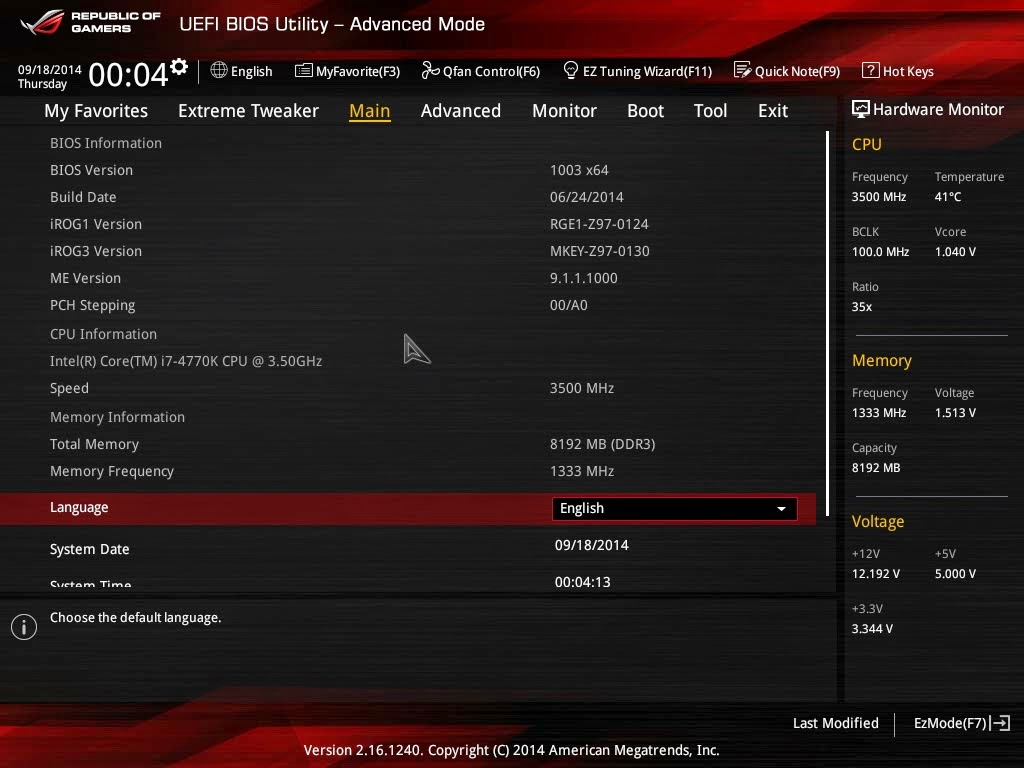
The Main tab displays mainly information of the system, users may change the language settings here if they wish.
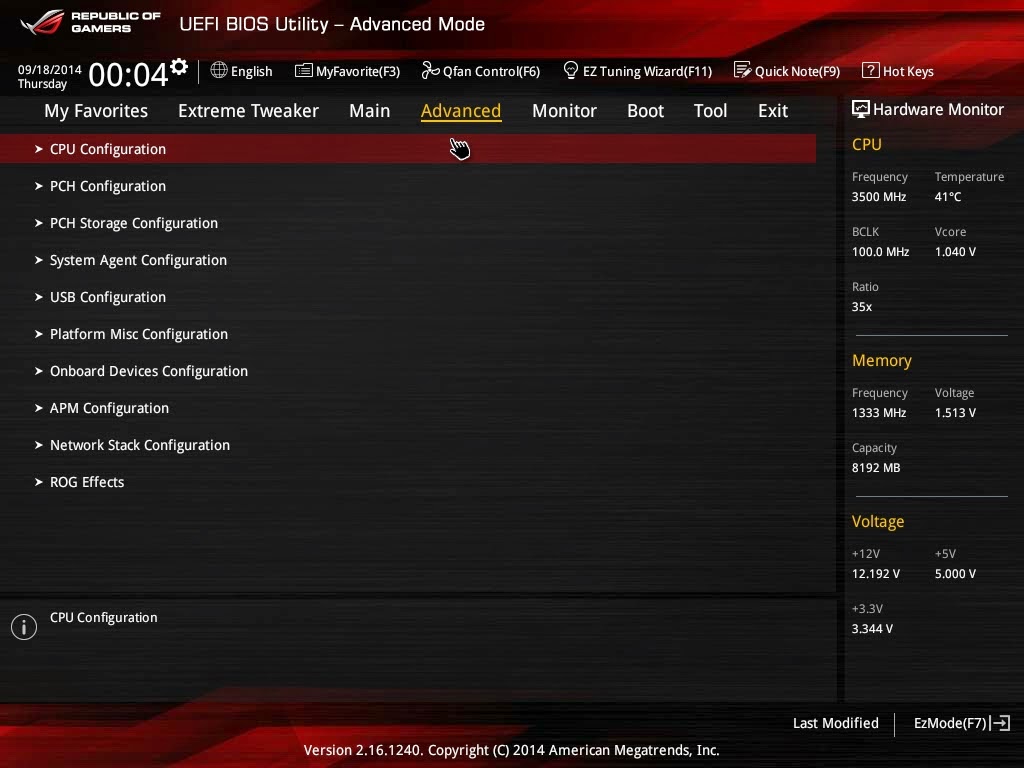
Onto the Advanced tab, users can configure settings in regards to the CPU, PCH, Storage devices, USB ports, On-board Devices, APM, Network Stack as well as the LED lighting of the motherboard nested inside ROG Effects.
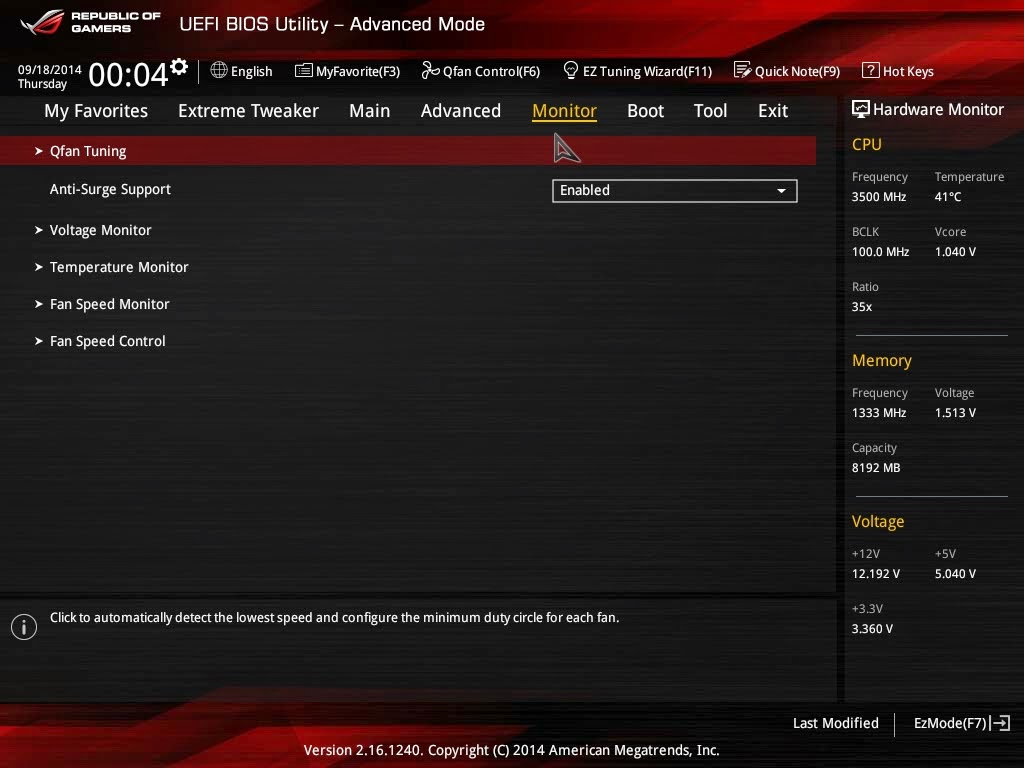
The Monitor tab will have all the info in regards to temperature, fan speed, voltage etc and allows users to fine tune fan speed accordingly to balance out the heat output from various components of the Ranger.
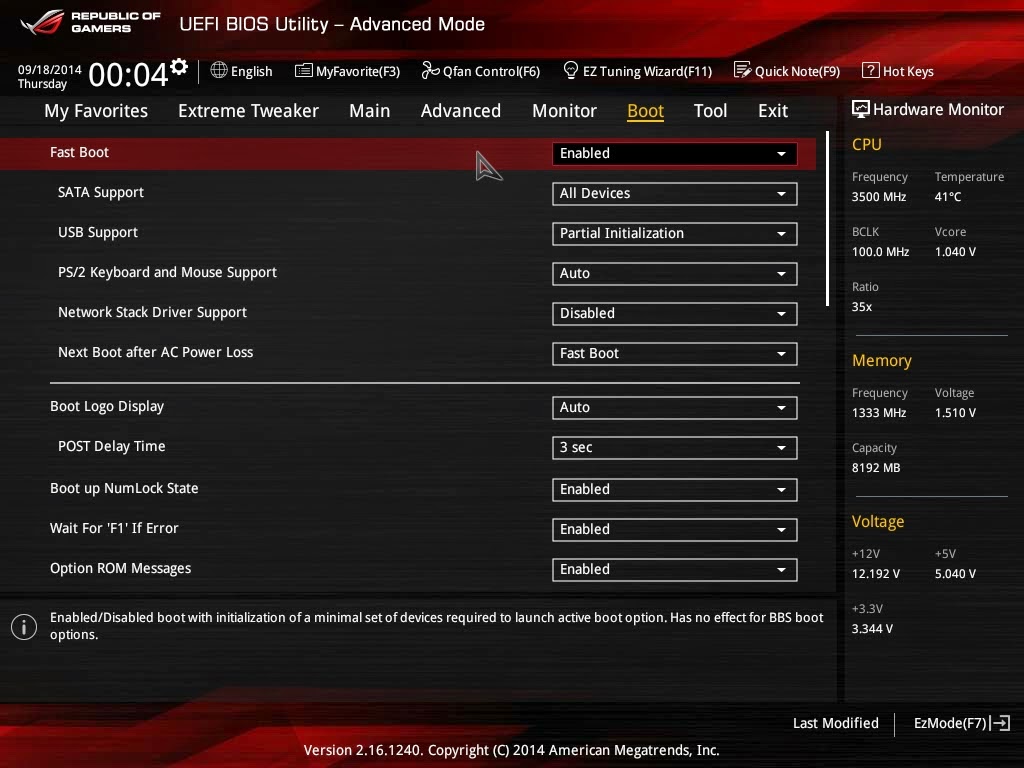
Up next is the Boot tab both boot options and POST options.
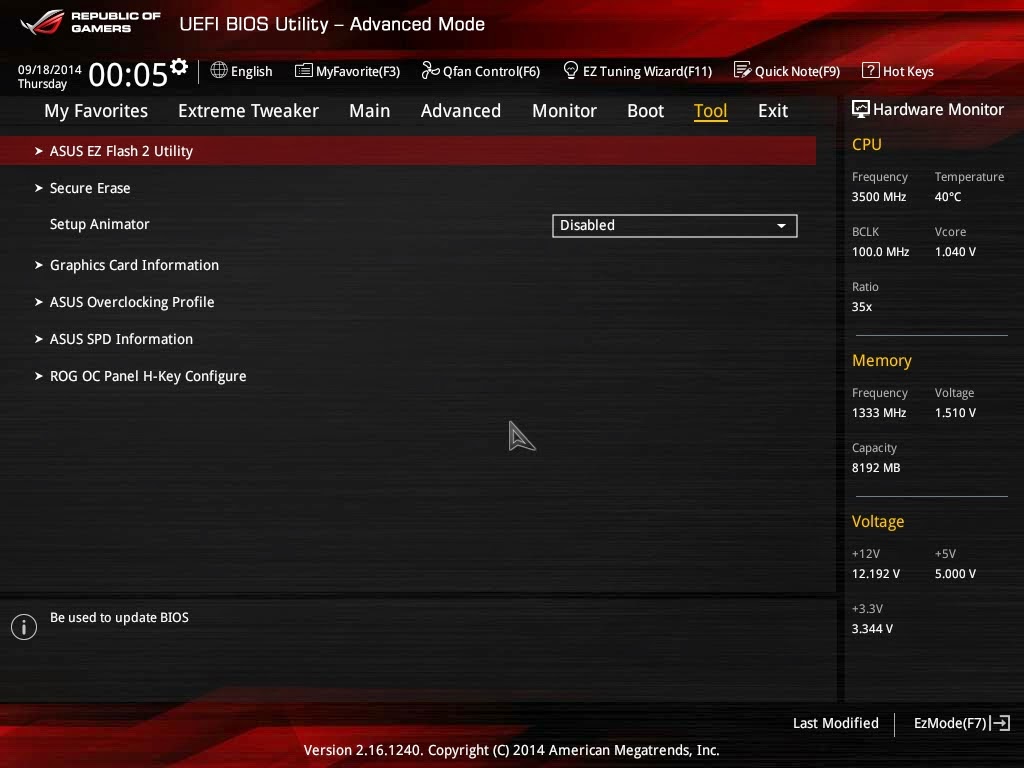
The tool tab comes with several useful feature such as the EZ Flash 2 utility for quick and easy BIOS update, Secure Erase for cleaning up your SSD for fresh OS installation, ASUS Overclocking Profile to save your best overclocking configuration and ROC OC Panel H-Key Configuration that works together with the ROG OC Panel.
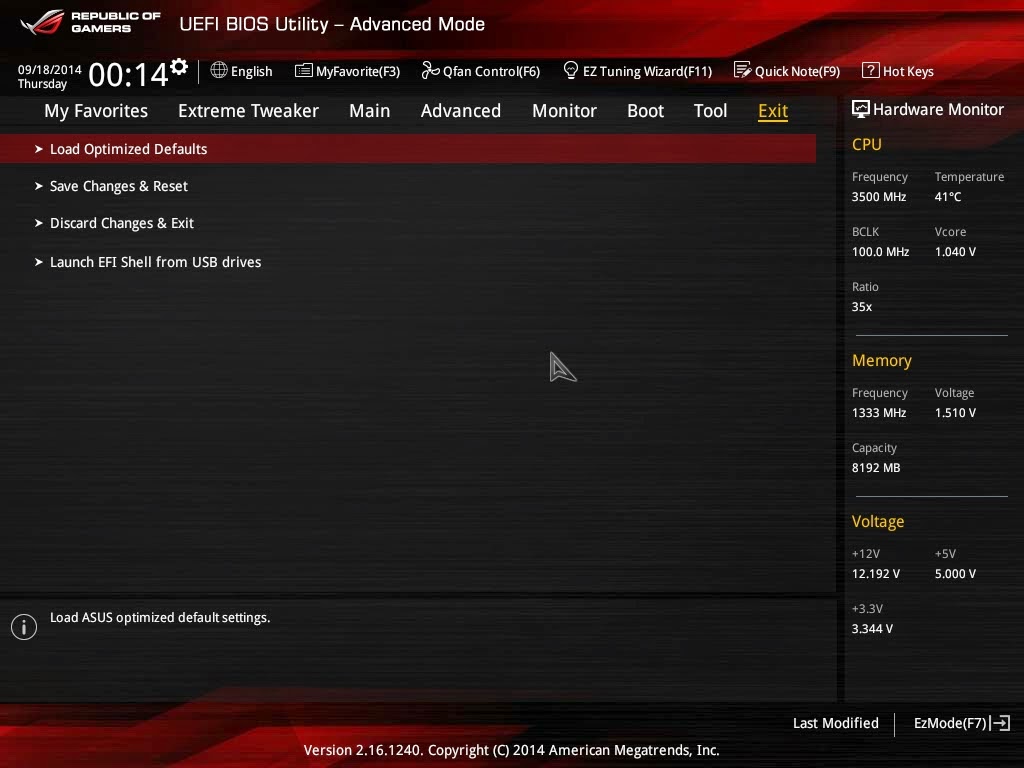
The functions in the Exit tab is pretty common but still worth to mention.
Load Optimized Defaults – Basically this will restore the changes done to the factory default settings.
Save Changes & Reset – This will save the changes done and restart your system.
Discard Changes & Reset – This will save the changes done and restart your system.
Both option 2 and 3 can be accessed without the need of accessing the exit tab as user will be prompted with a confirmation message when exiting the BIOS via the Esc key on your keyboard.
Notice that we left out the first tab? well the “My Favourites” tab is where you can customise your UEFI menu shortcuts in one convenient place so that there is no need to browse and scroll through the BIOS every time.
Software Suite
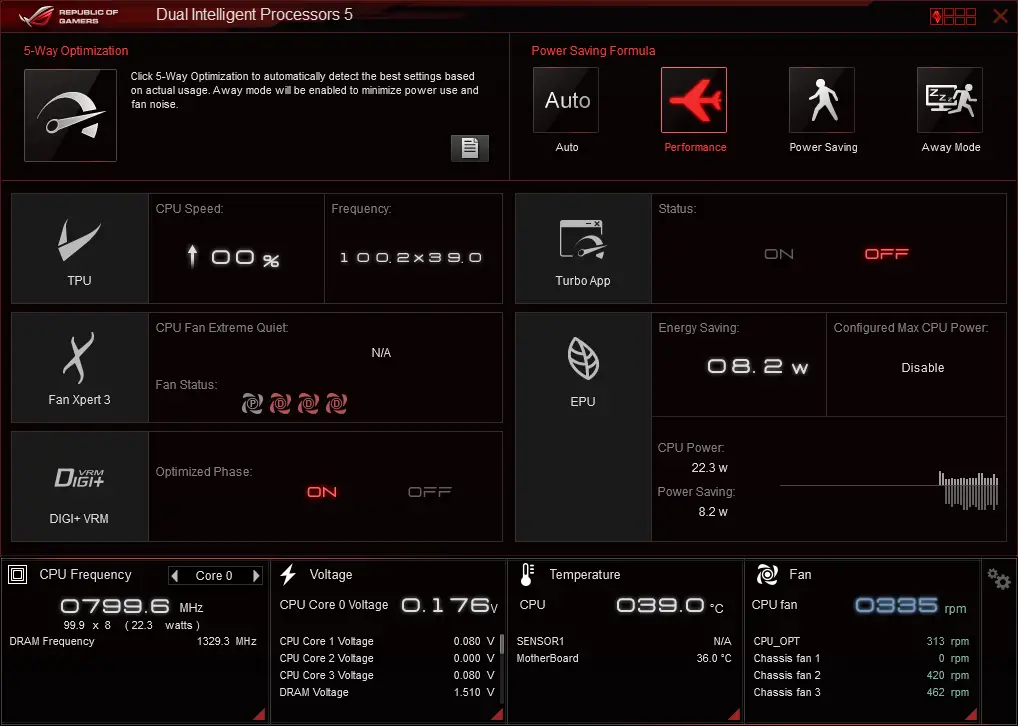
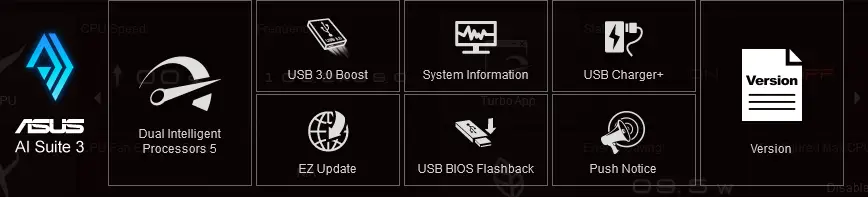
The AI Suite III software suite is available in the installation disc provided, but just in case, it’s always recommended to download the latest from ASUS’s website. Opening the suite will lead you to the main interface page consisting of accessible tweaks and toggles as well as full, on-the-fly system information at the bottom.
Clicking on the 5-way optimisation will prompt the suite to prompt for fan placement information. After that, the system is to be left alone and the software will handle the overclocking without the user having to dive into the UEFI menus.
And here is our result on our Intel Core i7 4770K. It’s not record-breaking but from a stock clock of 3.5MHz to 4.2MHz stable is quite impressive for an automated overclock setting.
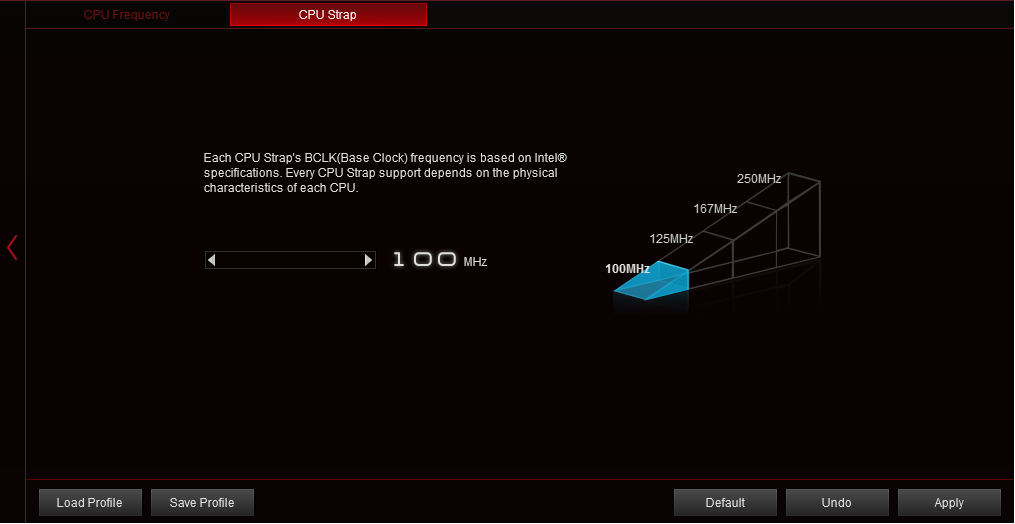
Clicking on the TPU button will bring you to the option to manually tweak the CPU Frequency, Core Voltage, Cache Voltage as well as the CPU strap. If you have no idea what I’m talking about here, I suggest that you leave this for another time.
Turbo App lets you prioritize your application that are running. You could also set the audio characteristics for that application and assign bandwidth of your LAN, especially useful for online gaming sessions.
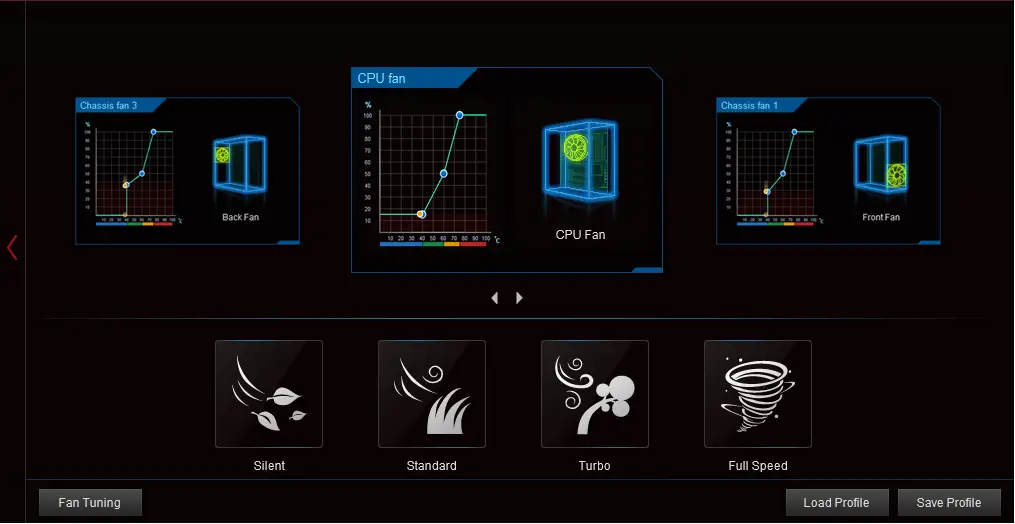
Fan Expert III lets you adjust the speed of the fans connected to the Ranger’s headers. Users may choose to set each fan manually or simply choose one of the four presets available at the bottom.
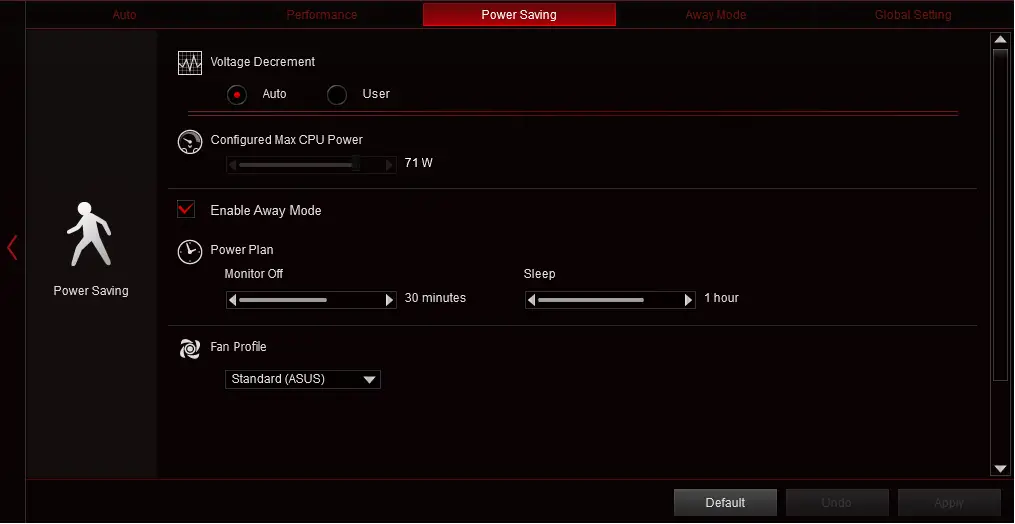
Clicking on the EPU option lets you adjust the Power saving formula profiles. Setting it on auto means that the system will run according to the needs of the system and will regulate the performance accordingly.
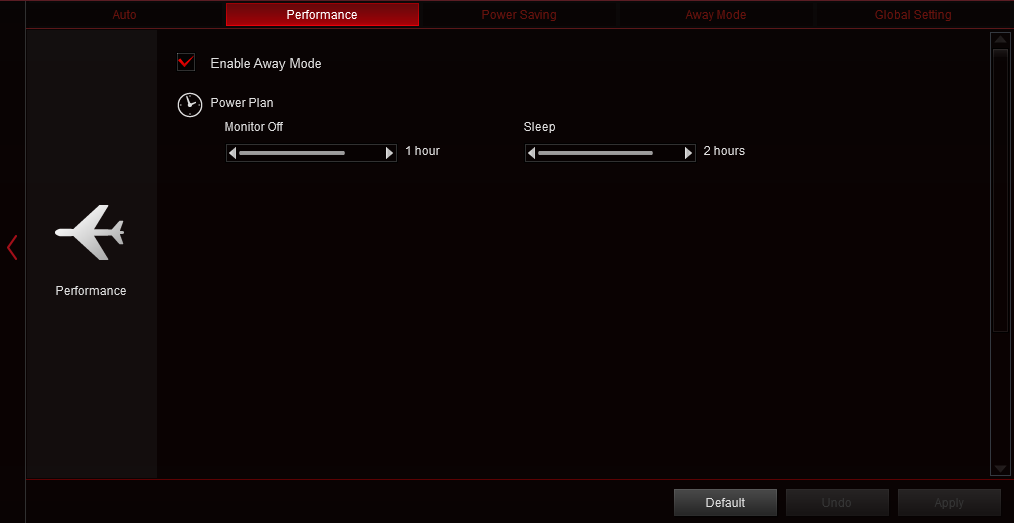
Performance allows you to configure your system to turn off the display monitor or sleep after a certain time lapse.
Power saving will set everything to run at the least power possible.
There’s even an away mode so that you could tell the system what to do should you are not on your desk for long periods of time.
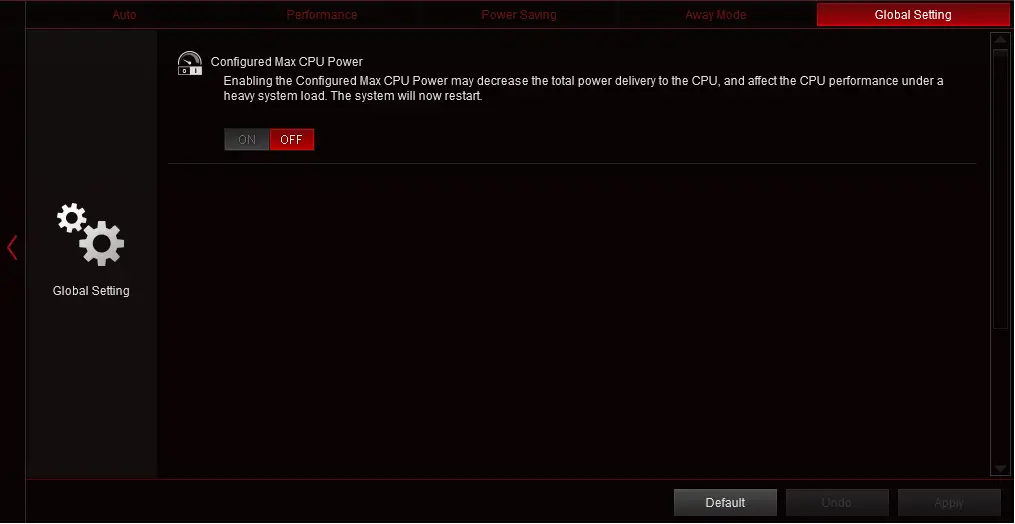
Global setting will enable you to set the maximum power delivered to the CPU, effectively limiting the power supplied to the CPU at the cost of performance. Note that a restart is needed for this feature to take effect.
Digi+ VRM option brings you the configuration menu of the CPU power phases.
There is a small menu like button at the top right that will pop out when clicked. This grants access to the nested features of the Ranger that is quite straightforward.
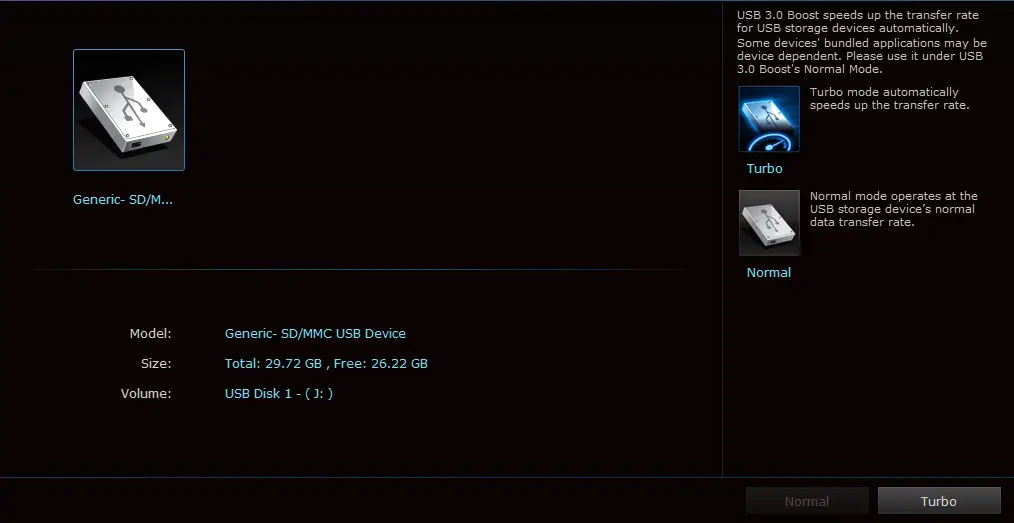
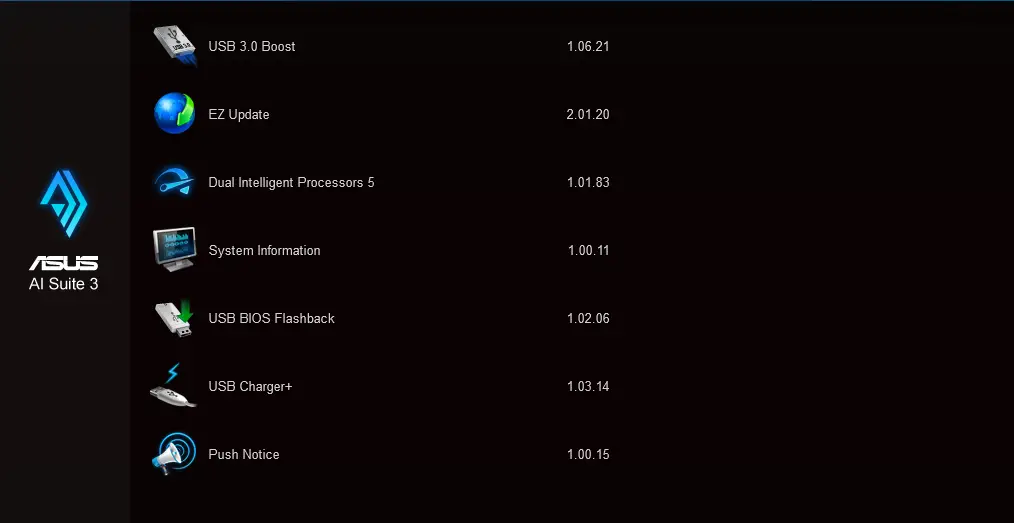
USB3.0 Boost allows UASP enabled device to perform faster in terms of reading and writing speed.
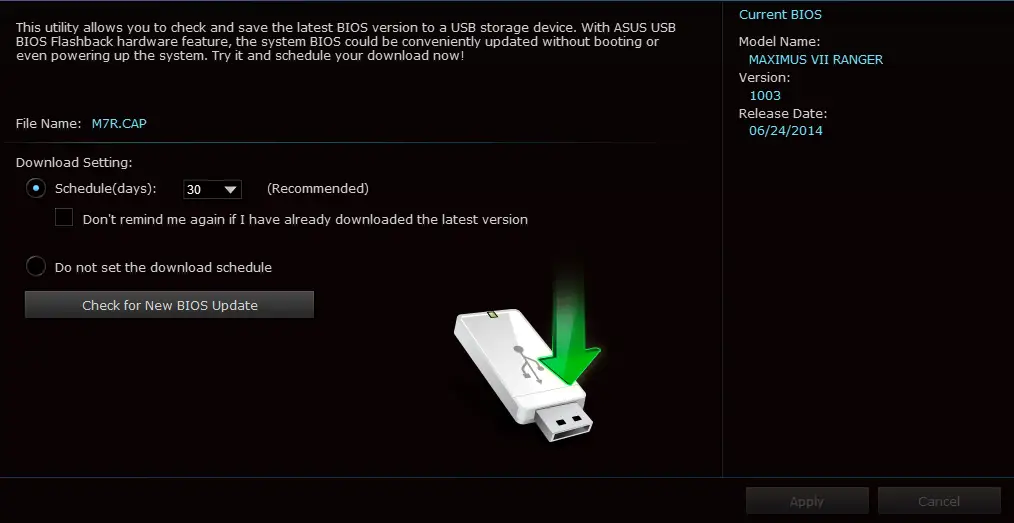
EZ Update allows you to check for the latest BIOS and download it directly from ASUS’s server for quick and easy BIOS update.
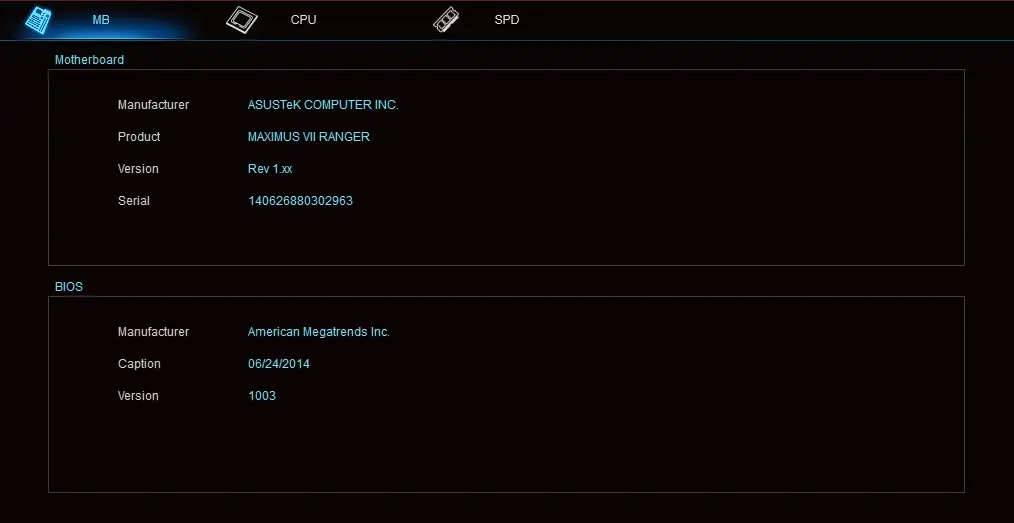
System Information displays on-the-fly system information, pretty similar to the features found on CPU-Z.
USB BIOS flashback for automatic BIOS update and BIOS backup.
USB Charger+ lets you set the USB3.0 ports to continue to provide power when the system is off, just in case you tend to plug your devices for charging.
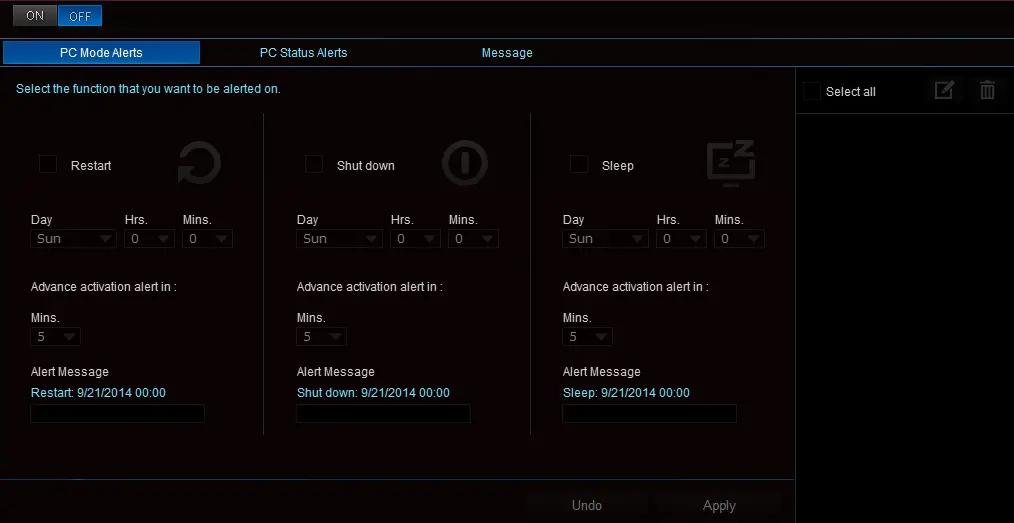
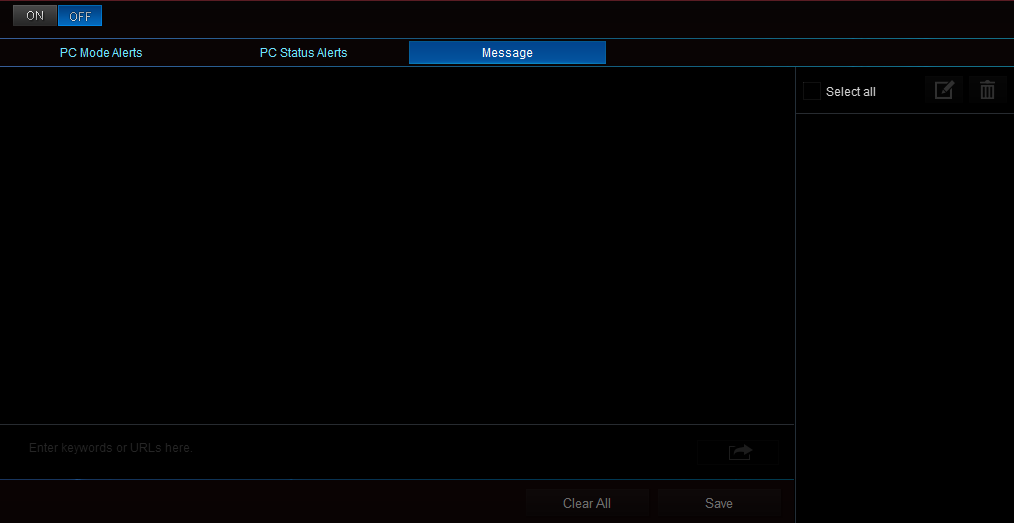
Push notice lets you set alerts as and when a system activity is detected such as during restarts, shut downs and sleep…
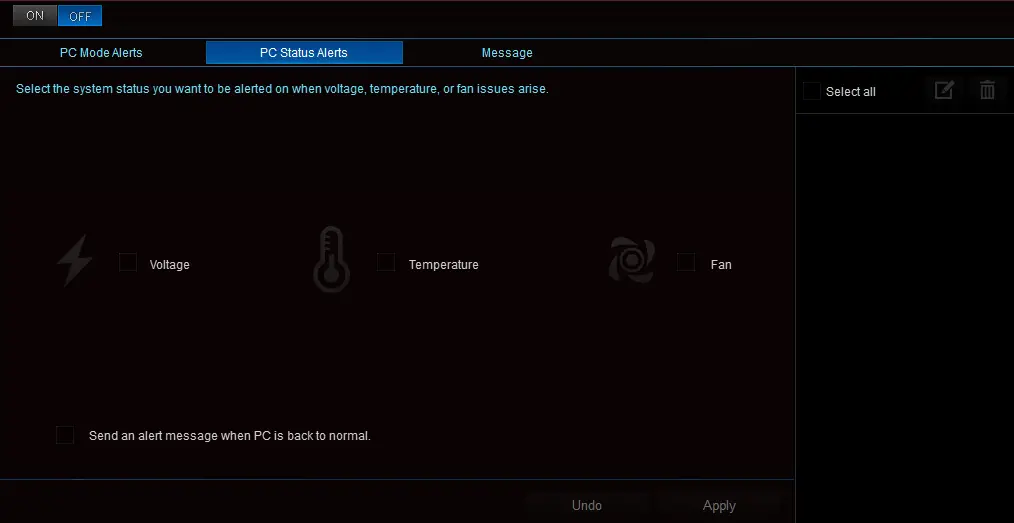
Or when there’s something wrong with the system’s voltage or temps or when a fan is faulty.
All with your own custom message display.
Finally you can check the versions of all the utilities installed to the Ranger.
Conclusion
Being a stripped down version of the Maximus Hero, there is not really a whole lot missing from the Ranger at all. You still get that great black & red ROG theme, the M.2 port, SLI or CFX capabilities as well as a feature rich suite. The Ranger is probably only classified as an entry level ROG due to the lesser power phases that affects overclocking capabilities. We believe that Asus has just made a dream of an uber looking gaming RIG just that much easier to achieve.
Pros:
Great looking colour scheme and design
AI Suite III, 5-Way Optimization Auto-Tuning for easy system optimization in the OS
Most of the features ara still available despite being a lower tier ROG motherboard
On-board debug code LED panel (Q-code)
Support new M.2 interface
Cons:
Lack of SATA Express, which is a new feature of Intel Z97 chipset
Less pleasurable overclocking experience compared to its higher end counterpart
With this, I am giving the Asus Maximus VII Ranger a Tech-Critter Gold and Recommended badge!