In response to AMD Ryzen’s overwhelming popularity among the enthusiasts, Intel has announced its 8th Coffee Lake CPU and we can finally have a 6-core Intel CPU for the mainstream users. Thanks to Gigabyte Malaysia, we managed to get our hands on the Gigabyte Z370 AORUS Gaming 7 and Intel i7-8700K for this review.
The Z370 AORUS Gaming 7 is positioned in the higher-end tier of Gigabyte’s latest Z370 series motherboards lineup and it packs quite a number of features that might pique interest the early adopters, i.e 2 x Gigabit Ethernet LAN (Intel and Killer Network), support of up to 3 x M.2 SSD, new onboard audio design and Dac-Up 2 for USB, more juicy RGB feature and support for up to 300 Digital LED, etc.
In this review, we’ll be taking a closer look at the Z370 AORUS Gaming 7 on the features offered, as well as the improvement which we can expect compared to the previous gen.
Unboxing

AORUS has been recognized as the official gaming oriented brand for Gigabyte motherboards since the previous gen and we have to say, this is probably the best decision ever made by Gigabyte. Personally, we find the AORUS logo to be way more distinctive than the G1 Gaming ‘eye’ logo, giving a little bit more characteristic to the whole brand itself.

At the back of the box, you’ll find the highlighted features for the motherboard i.e the first of its kind RGB fusion that supports up to 300 LED, AMP-UP audio for better overall gaming audio regardless of your audio devices, support for up to 3 x NVMe PCIe x4 M.2 SSDs, fan stop thermal design for quiet operation without compromising the overall performance, etc.

Accessories wise, you’ll find the usual stuff like user’s guide, driver CD, rear I/O shield and SATA cables. The model dependent extras will be the AORUS label stickers, thermal sensors, cable for RGB LEDs, velcro straps and the high-bandwidth bridge for NVIDIA GTX 10 series graphics cards.

The Armor design which resembles the AORUS eagle and the AORUS logo printed on the motherboard PCB gives the Z370 AORUS Gaming 7 a much more distinctive appearance compared to the previous generation Z270 AORUS motherboards.

One thing that caught our attention while inspecting the motherboard is that the thin metal sheet on the VRM heatsink is prone to accidental damage and Gigabyte should really consider on using a bigger heatsink to fill the gap as shown in the photo above.
 Under the rear I/O armor, you’ll find an additional 35mm cooling fan to cool down the VRM. It is a known issue by early adopters of the Z370 motherboards and we have confirmed this with Prime95 stress test using an Intel i7-8700K running at 5.1GHz. The highest temperature for VRM as observed on HWInfo64 is 86°C, but Gigabyte got this fixed with the F4a BIOS update.


As for the DIMM slot and PCIe slot armor, it was first introduced on higher-end Z170 motherboard as an extra protection against tearing damage. It has been a thing since then and you can see these metal covers on almost every high-end motherboards nowadays.

An M.2 SSD heatsink is included together with the Z370 AORUS Gaming 7 to improve the heat dissipation for M.2 SSD that doesn’t come with a heatsink. Though there are some exceptions, the heatsink will still provide you that extra 2 – 3 °C difference if it is installed correctly.


Here we can see the usual offering for the enthusiasts. As usual, switches for power on, reset, clear CMOS and debug LED for troubleshooting. It’ll be great if all the manufacturers can actually consider to at least include the debug LED and clear CMOS switch on lower-end boards for the ease of troubleshooting.


While U.2 interface has made its major appearance on newer X99 and Z170 motherboards as the better alternative for SATA Express because it’s not limited to only two lanes. Gigabyte didn’t include the U.2 interface on the Z370 AORUS Gaming 7, but you’re getting a total of 3 x M.2 on this motherboard and unlike U.2 devices, M.2 SSD is a lot easier to find nowadays.
 Not exactly a big fan of RGB here but if you’re very enthusiastic with all the RGB trend that has been going on nowadays and wanted to put up a good light show to impress your friends, the Z370 AORUS Gaming 7 has a 12V RGBW header that is capable of supporting up to 300 individual 12V RGB LED and a more accurate white color on the LED.

For its audio, the Gigabyte AMP-UP Audio on the Z370 AORUS Gaming 7 offers ESS SABRE with a DAC that adopts the concept of a high-end audiophile sound system design into a micro-system within the motherboard. According to Gigabyte, the Smart Headphone Amp feature will automatically detects the impedance of the headphone you’re using to provide the optimal audio dynamics for a better overall experience.

As for the rear I/O, you’ll find a PS/2 port, HDMI and DisplayPort for display, a USB 3.1 Gen 2 Type-A (red) and type-C port each, 5 x USB 3.1 Gen 1 ports, 1 x Intel Gigabit Network LAN, 1 x Rivet Networks Killer E2500 LAN and the audio jacks.
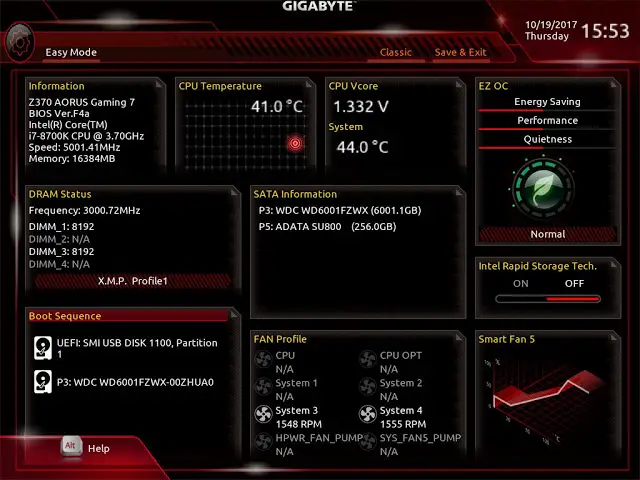
BIOS: Easy Mode

BIOS: Classic Mode


Software: Sound Blaster Connect


Of course, the software doesn’t limit the users to use only the provided preset. If you’re planning on creating your own preset, you can go to the sound tab for extra audio tweaking options.


The software even allows you to select the type of audio devices that you’re using to further enhance your overall experience in gaming, music and other entertainment needs.
Software: RGB Fusion


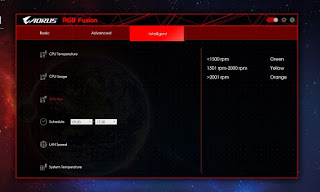
Gigabyte is currently the only one capable of controlling 300 digital LED individually. Given the number of lighting modes and fluidity it can deliver, your chances of turning your system into a Christmas tree is a lot higher than other brands. You can also adjust the onboard RGB LED on different section of the motherboard for the desired lighting effect, or simply use it as your temperature indicator. If you breathe RGB, the RGB Fusion is definitely something you’ll find yourself messing with after getting the motherboard.
Setup Configuration
Test Bench Configuration | |
| CPU Cooler | XSPC RayStorm Pro Ion AX240 |
| CPU | Intel Core i7 8700K |
| Graphics Card | NVIDIA GeForce GTX 1080 Founders Edition |
| Memory | Apacer Panther Rage Illumination DDR4 |
| Primary Hard Drive | ADATA Ultimate SU800 256GB |
| Power Supply | be quiet! Straight Power 10 600W |
| Chassis | Cooler Master Test Bench V1 |
CPU Benchmark


CPU and Memory Overclocking

We started off the CPU overclocking with Gigabyte’s auto-overclocking feature and we managed to get a pretty solid 5.0GHz clock speed on the Intel 8th Gen Core i7 8700K. Hitting 5.0GHz on a 6 core 12 thread CPU has never been this easy, especially when it’s done by the system-determined software.
The only thing that is still limited is the memory overclocking, which will require you to manually adjust all the relevant settings if you wish to go beyond the rated frequency.
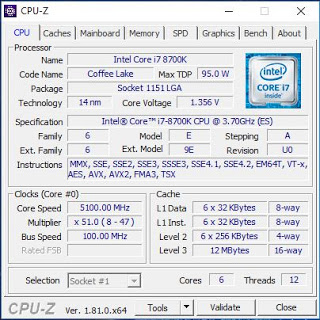

Running the i7 8700K at 5.1GHz is easy as breeze as well and it doesn’t require any additional adjustments to other voltages at all. The highest temperature recorded during stress test is only a mere 84°C, which is quite impressive. We managed to get the i7 8700K to run at 5.2GHz on manual method, but the CPU will get too hot – over 90°C within seconds after starting the stress test and the CPU will start throttling back to keep the temperature low.
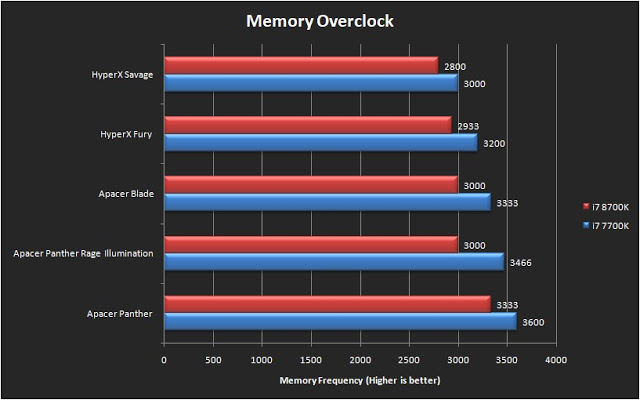
Moving on to memory overclocking, I’m using the DDR4 kit we have here in the test lab because we weren’t able to get our hands on any of the awesome and fancy memory kits like the GALAX HOF or G.Skill TridentZ, but these kits aren’t really bad either.
The DDR4 kits we have here in the lab:
- HyperX Savage 2666MHz
- HyperX Fury 2666MHz
- Apacer Blade 2800MHz
- Apacer Panther Rage Illumination 2400MHz
- Apacer Panther 2400MHz
To my surprise, these kits aren’t doing as good as they were on a Z270 motherboard using the i7 7700K. I’ve confirmed the issue with a friend of mine, owikh84, who is currently overclocking on Z370 motherboard as well, finds it rather difficult to overclock one of his memory kit that can easily do 4266MHz on the previous gen motherboard.
Final Thoughts
Starting off with the aesthetics, we must say that Gigabyte has finally got the right person to get their gaming motherboard design to the next level. From the scale of 1 to 10, we’d say that the Z370 AORUS Gaming 7 deserves a 10 in terms of the appearance. While this might not be everyone’s favorite, but the 300 individual RGB LED support which Gigabyte claimed to be the first in the industry to achieve will surely please the RGB fanatics who are probably going to turn their system into a Christmas tree.
Performance wise, the Z370 AORUS Gaming 7 did better than what we’ve expected. We can say very honestly that we were quite skeptical at first, knowing that Intel is rushing the release of the Z370 chipset and Coffee Lake CPU because of the AMD Ryzen CPU.
The i7 8700K alone is enough to impress us with its boost clock of 4.7GHz and how easy it is to push this 6 core 12 thread CPU to 5.0GHz with minimal effort. Memory overclock is the only exception here though, as we find it rather difficult to push our best kit on hand to what it is capable of. There are chances for older DDR4 kit to perform better, since the latest version F4a has somehow fixed the VRM overheating issue and slightly improved the memory compatibility. Let’s just hope that the upcoming BIOS update will improve the support for older DDR4 memory kit.
The Gigabyte Z370 AORUS Gaming 7 doesn’t come cheap of course, but the price is RM1,299 can still be justified by the aesthetics, features, performance and the bundled 1-year license for XSplit Gamecaster and Broadcaster.
Pros
- A much better-looking design
- Metal cover strengthen PCIe and DIMM slots
- Pre-installed VRM heatsink cooling fan
- Decent overclocking features
- Comes with onboard switches and Debug LED
- Good audio software – Sound Blaster Connect
- Support up to 300 RGB Digital LED, first of its kind
- Support up to 3 x M.2 SSD, can be configured to run on RAID0
- 1-year license for XSplit Gamecaster and Broadcaster
Cons
- Memory overclock isn’t as good as the previous gen
- The thin metal cover on the VRM heatsink is prone to accidental damage