
A VPN provides the level of security and privacy one needs to stop the third party from snooping on their online activities. This level of privacy and security is possible because a VPN server offers a private route from which one can access a public server.
Regardless if you live in a rural area or not, it’s important that you consider VPN at all times to increase the level of security when browsing online. But if you’re living in a rural area looking for a credible ISP you can rely on, you have to make the right choice and put Viasat at the top of the list. DailyWireless has a review about their price and plan which you can rely on so make sure you check that out.
Before using a VPN just like any other software, there is the need to set it up on one’s computer. Setting up a VPN simply involves following laid down steps, and one can easily set up a VPN without any form of technical assistance. In this article, we go through the process of setting up a VPN for in Windows. Our focus with this article is Windows 10. The pre-requisite is, of course, provided if you already sign up a VPN service.
When setting up a VPN in Windows, one can use the software offered by the VPN provider. Alternatively, one can also use other third-party software such as OpenVPN client or Microsoft’s VPN client. It should, however, be noted that the custom software of the VPN provider offers the highest level of flexibility. Microsoft’s inbuilt VPN client is, however, suitable for the use of a VPN protocol that is not supported by one’s VPN service provider.
Setup Guide
We now go through the steps of setting up a VPN in Windows 10 with the inbuilt VPN client. This process depends on the protocol used. With IKEv2 protocol, one must download the certificate and install it first with the steps we will be highlighting at the end of the article.
Step 1

Search for VPN on the taskbar, or from settings, search for VPN. One should easily locate the VPN settings without any problem. Click “Add a VPN connection”.
Step 2
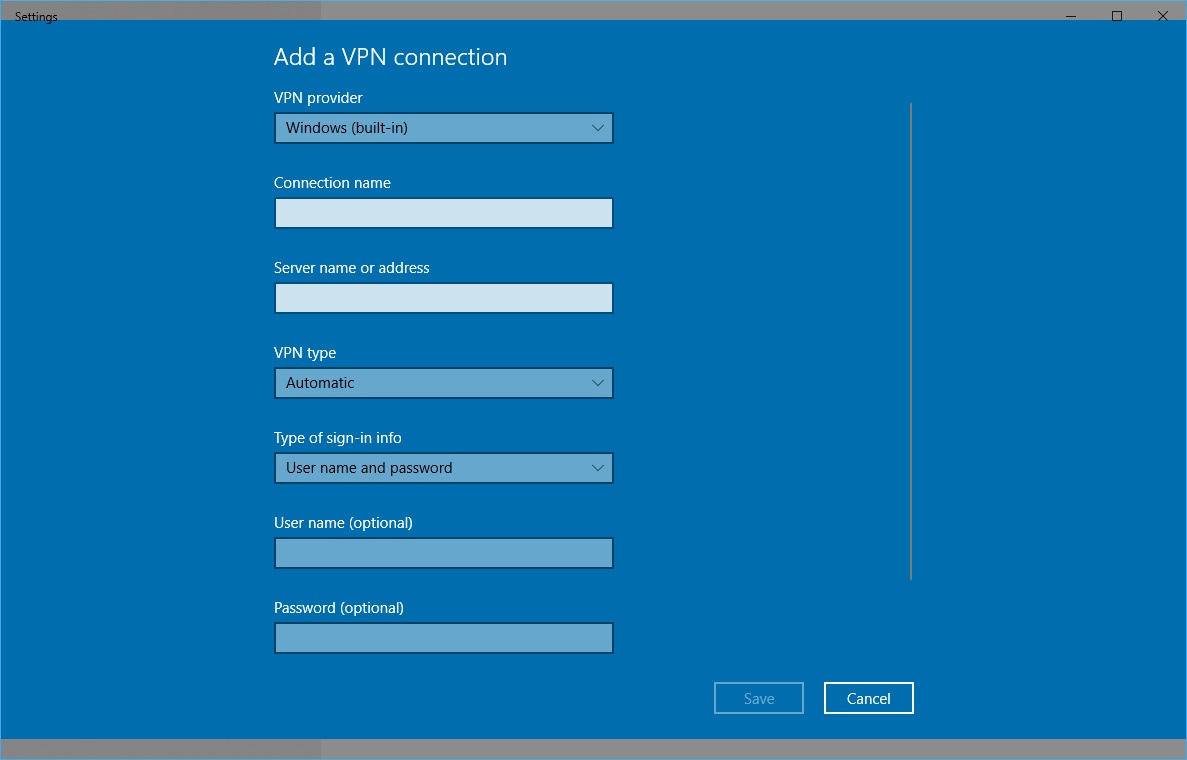
From either of the methods highlighted above, the page that opens requires entering of the details of the VPN. The details that will be required include connection name and server name. The connection name and server name depends will be provided by the VPN service.
One will also be required to choose a VPN provider at this stage from a drop-down list. Choose Windows built-in. On making this choice, the VPN type will change to “automatic” and the type of sign-in info will become “username and password”.
Step 3
After making the entries highlighted in step 2 above, a spot to enter the username and password of the VPN will appear. The username and password of the VPN which was provided by the VPN service should be entered into this spot.
Step 4
Afterwards, with all the entries correctly made, the settings should be saved. After saving the settings, exit the setting app.
Step 5
After closing the setting app, go to the taskbar and click on the Wi-Fi icon. On clicking on this icon, the VPN connection which was set up from steps 1 to 5 should be on top of the connection option.
Click on the VPN and your computer will connect to the VPN server if you followed all the steps highlighted above correctly. If the connection is not made, go through all the steps above again to ensure that you didn’t miss anyone.
Take Note
Do note that these steps are for setting up a VPN with Microsoft’s built-in VPN client in Windows 10. The steps may differ with a custom software or third-party software or even Windows 8.
One must have an active VPN subscription for this setup to work.
Preset for IKEv2 Protocol
We now go through the necessary steps needed for setting up a VPN with an IKEv2 protocol. These extra steps are necessary because one needs to download the IKEv2 certificate of their VPN provider and install the certificate following the steps listed below.
After downloading the certificate from the VPN provider, double-click the certificate will show the information of the Certificate. Click “install certificate” which will lead to the certificate import wizard. Then choose the local machine option and click “next”. On the next page, choose the place all certificates in the following store option and click “browser”. From the small window which should pop up next, choose the trusted root certification authorities option and then click “OK”.
The previous action brings up the certificate import wizard window from where one can then click “next”. Clicking next brings up another page where one should click “finish”. At the point, following all the highlighted steps, the process of installation of the certificate is complete.
After successful installation of the IKEv2 certificate with the steps above, proceed with the steps 1 to 5 highlighted in the first section and your VPN should be correctly set up. As we mentioned earlier, setting up a VPN is a complete DIY step following the steps which we highlighted above, for IKEv2 protocol and the easier protocols.


