In today’s digital age, managing our ever-growing collection of photos, videos, and documents can feel like a constant battle. Cloud storage services like Google Drive and Dropbox offer a convenient solution, but concerns about privacy and subscription fees can be a turnoff. Enter the Synology BeeStation, a new contender aiming to shake things up in the personal cloud storage market.
This compact device promises a user-friendly, subscription-free approach to data backup and management. But does the BeeStation live up to its promises? In this review, I will share my personal experience after setting up the BeeStation and talk about the features, performance, and help managing your expectations. I hope this will help you decide if the BeeStation is the key to simplifying your personal cloud storage needs.
What’s in the box:

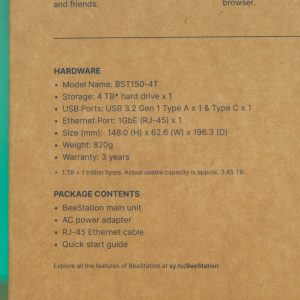

Those who are familiar with Synology products would immediately recognize this signature brown paper box with subtle printings. The main unit and accessories are well protected within the packaging.
- Synology BeeStation
- 36W AC power adapter
- RJ45 ethernet cable
- quick start guide
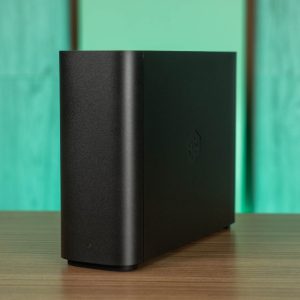
Synology BeeStation

Don’t let the outlook deceive you. Even though the BeeStation may look exactly like many other external storages, this chassis houses not just the HDD but also the main board that executes all the personal cloud operations.
Yes my friends, this will be the “cloud server” for all your photos and files.

This is exactly why we’re getting a dedicated RJ45 ethernet port at the back. This unit is meant to be physically connected to the router directly instead of your computer. This allows you to access to your data around the globe.

Passive ventilation for cooling of the inner components.
Synology BeeStation Setup
")
Remember, you will need to connect the RJ45 ethernet cable to the router or else you will not be able to proceed with the setup. Frankly speaking, as long as you follow the instructions, the setup process would be a breeze.
")
Synology account is required for the setup.
Once you’re done with the registration and setup, the BeeStation is ready for pairing with your computer or phone.
Generally, there are three ways to access the BeeStation:
- Desktop client – BeeStation for Desktop
- Mobile client (Android & iOS) – BeeFiles or BeePhotos mobile app
- Web browser – Access through https://portal.bee.synology.com/
Desktop Access
For PC, you can download the BeeStation for Desktop app:
")
Remember how you setup the BeeStation earlier? Now you just need to sign into the desktop client using your Synology Account.
")
The client will also help you create a folder that directly access the files on the BeeStation.
")
Every single file saved into this folder will be synced to the BeeStation.
")
Generally, the desktop client has straightforward features if you’re used to Google Drive.
")
One thing that’s unique to the BeeStation desktop client is the ability to sync with BeePhotos. That means any photos you saved into the assigned folder will be synced to the BeeStation.
Mobile App Access
There are two types of mobile client applications for different use cases:
BeeFiles: Cloud file storage app that works just like Google Drive and Dropbox.
BeePhotos: Photo gallery & cloud backup that works just like Google Photos.
Personally, I would prefer if they can combine both apps into a single BeeStation super app but judging from how they wanted to keep the experience streamlined with many other competitors’, I guess this method is doable.
BeeFiles

If you’re used to any of the cloud storage apps, you will feel at home with the BeeFiles app. It works just like how you would imagine it to be. You can access all the files stored in the BeeDrive from anywhere as long as you have internet access. Remember the folder it created on your computer? The files you stored in that folder can be access from your phone as well.
BeePhotos

That goes without saying, the BeePhotos works just like your phone’s photo gallery.

On top of that, it has the ability to backup your photos to the BeeStation without having the need to manually plug in a cable or external storage drive. It is exactly like how Google Photos and iCloud Photos work.
Web Browser Access
")
Synology BeeDrive’s personal cloud is not rocket science. Other than desktop and mobile app, the most basic browser access is also available if you’re logging in from other machines.
")
You can even link your existing cloud storage provider and sync the files to your BeeStation. This is a remarkable feature which I hope is also available for migrating existing Google Photos to Synology BeeDrive.
")
Web BeePhotos access.
System Settings
")
The web interface also allows in depth access to the BeeDrive configuration pages.
Backup the BeeStation
")
This is one of the most crucial function for the BeeStation. Since the device itself only houses a single 4TB drive without any redundancy. Right now, Synology only offers 2 ways to backup your BeeStation:
- Backup to an external drive
- Backup to Synology C2 (cloud server)
Ironically, the Synology C2 is yet another paid cloud services. Well, it is not like the C2 cloud service is bad but if you’re selling personal cloud by promising client’s self control over his privacy, offering a cloud service seems like shooting at your own foot. Well, at least they allow you to use alternative way to backup (which is a less desirable external drive).
Personally I would hope they could at least offer a third backup option – backup to another Synology BeeStation. Especially a unit that is setup at a different location, perfect as disaster recovery. But hey, judging from how this product is targeted at newbie users, I guess explaining why they might need two units of the BeeStation can be a challenging task.
Local Access
")
Last but not least, I just so happened to stumble upon this hidden feature – enabling local SMB access. Okay, SMB is not exactly “advanced” but, again, this product’s user group is not someone who I would describe as “tech-savvy”. Naturally SMB may be an alien concept for them.
I don’t blame any party, neither the user nor Synology. In fact, I applaud Synology team for keeping this feature to allow users to capitalize on the local connectivity and get a faster files access.
Final Words – Synology BeeStation

In conclusion, the Synology BeeStation fills a distinct niche in the personal cloud market. For those seeking a secure alternative to privacy-conscious cloud services and who are intimidated by traditional NAS complexity, the BeeStation offers a compelling solution. Its user-friendly approach makes personal cloud storage accessible to a wider audience, ushering in a new era of data ownership and control for the everyday user.
Where to buy:
Amazon: https://amzn.to/3UhZYG1
Shopee: https://invl.io/clkzxxj
Lazada: https://invol.co/clkzxxi